This page houses tutorials on the creation and use of web apps for virtual beaver dam censusing. At the bottom of this page is the list, with links, of the completed web apps.
The steps to making a virtual beaver dam census web app are as follows:
- Create a Survey123 survey
- Create an ArcGIS Online web map with necessary layers, these layers can vary but at the minimum should include the Survey123 survey, perennial network, and a basemap to survey.
- Publish the web map as a web app on ArcGIS Online.
To download this guide as a PDF file please Click Here (PDF not yet live). This PDF also goes into greater depth with more images to walk you through the process.
Creating the Web App
Step 1 Survey123
This step will create a survey that enables data collection and storage.
Begin by going to Survey123 and sign in to your ArcGIS Online account
Once logged in, click on “New Survey” in the upper left to begin creating a new survey. Click “Get started” under “Blank survey”.
Once the survey has been created give your new survey a relevant title. When naming the surveys, try to be very specific. The surveys will be uploaded to ArcGIS Online as Feature Layers, just like shapefiles and other layer files. Be very specific about what area the survey is for, and that it is a survey. This helps to quickly find and determine which feature layers are actual surveys in the ArcGIS Online content.
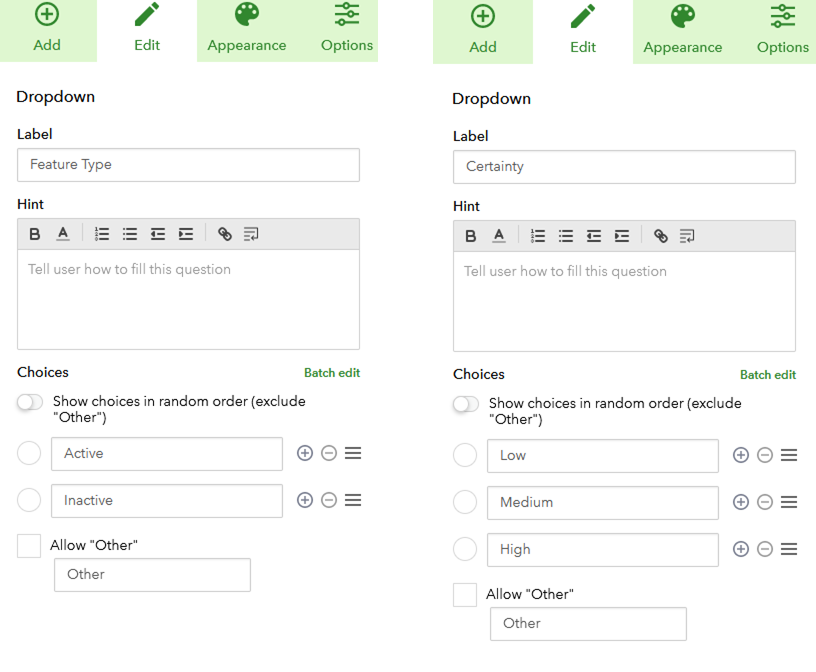
The right hand side of the screen will display a menu where survey questions can be created. Click and drag two “Dropdown” questions into the survey. Additional questions can be added at this time. If using imagery with multiple date captures (e.g. Google Earth Pro) “Single choice” questions can be added for each date with an option for “Yes” or “No”. Doing the questions for date in this way makes the resulting feature layer’s attribute table easier to use for any later data processing.
Once the two questions have been added, click the question to edit. At minimum have one question, “Feature Type” with an answer choice for inactive and another choice for active dam and the other question “Certainty” with choices for low, medium, or high. To delete or add additional answer choices, use the + and - buttons beside answers.
At this point click publish in the bottom right corner of the “Edit” menu.
Now that the survey and feature layer have been created, permissions need to be edited so that the feature layer that has been created will be usable for data collection. To do this, navigate to your ArcGIS Online content. From there locate where your survey has saved to, this is typically by default a folder called Survey-[Your Survey’s Title]. You will need to do the following steps on each of the 3 feature layers in that folder for your survey. [Your Survey’s Title]_stakeholder, [Your Survey’s Title]_fieldworker, and [Your Survey’s Title].
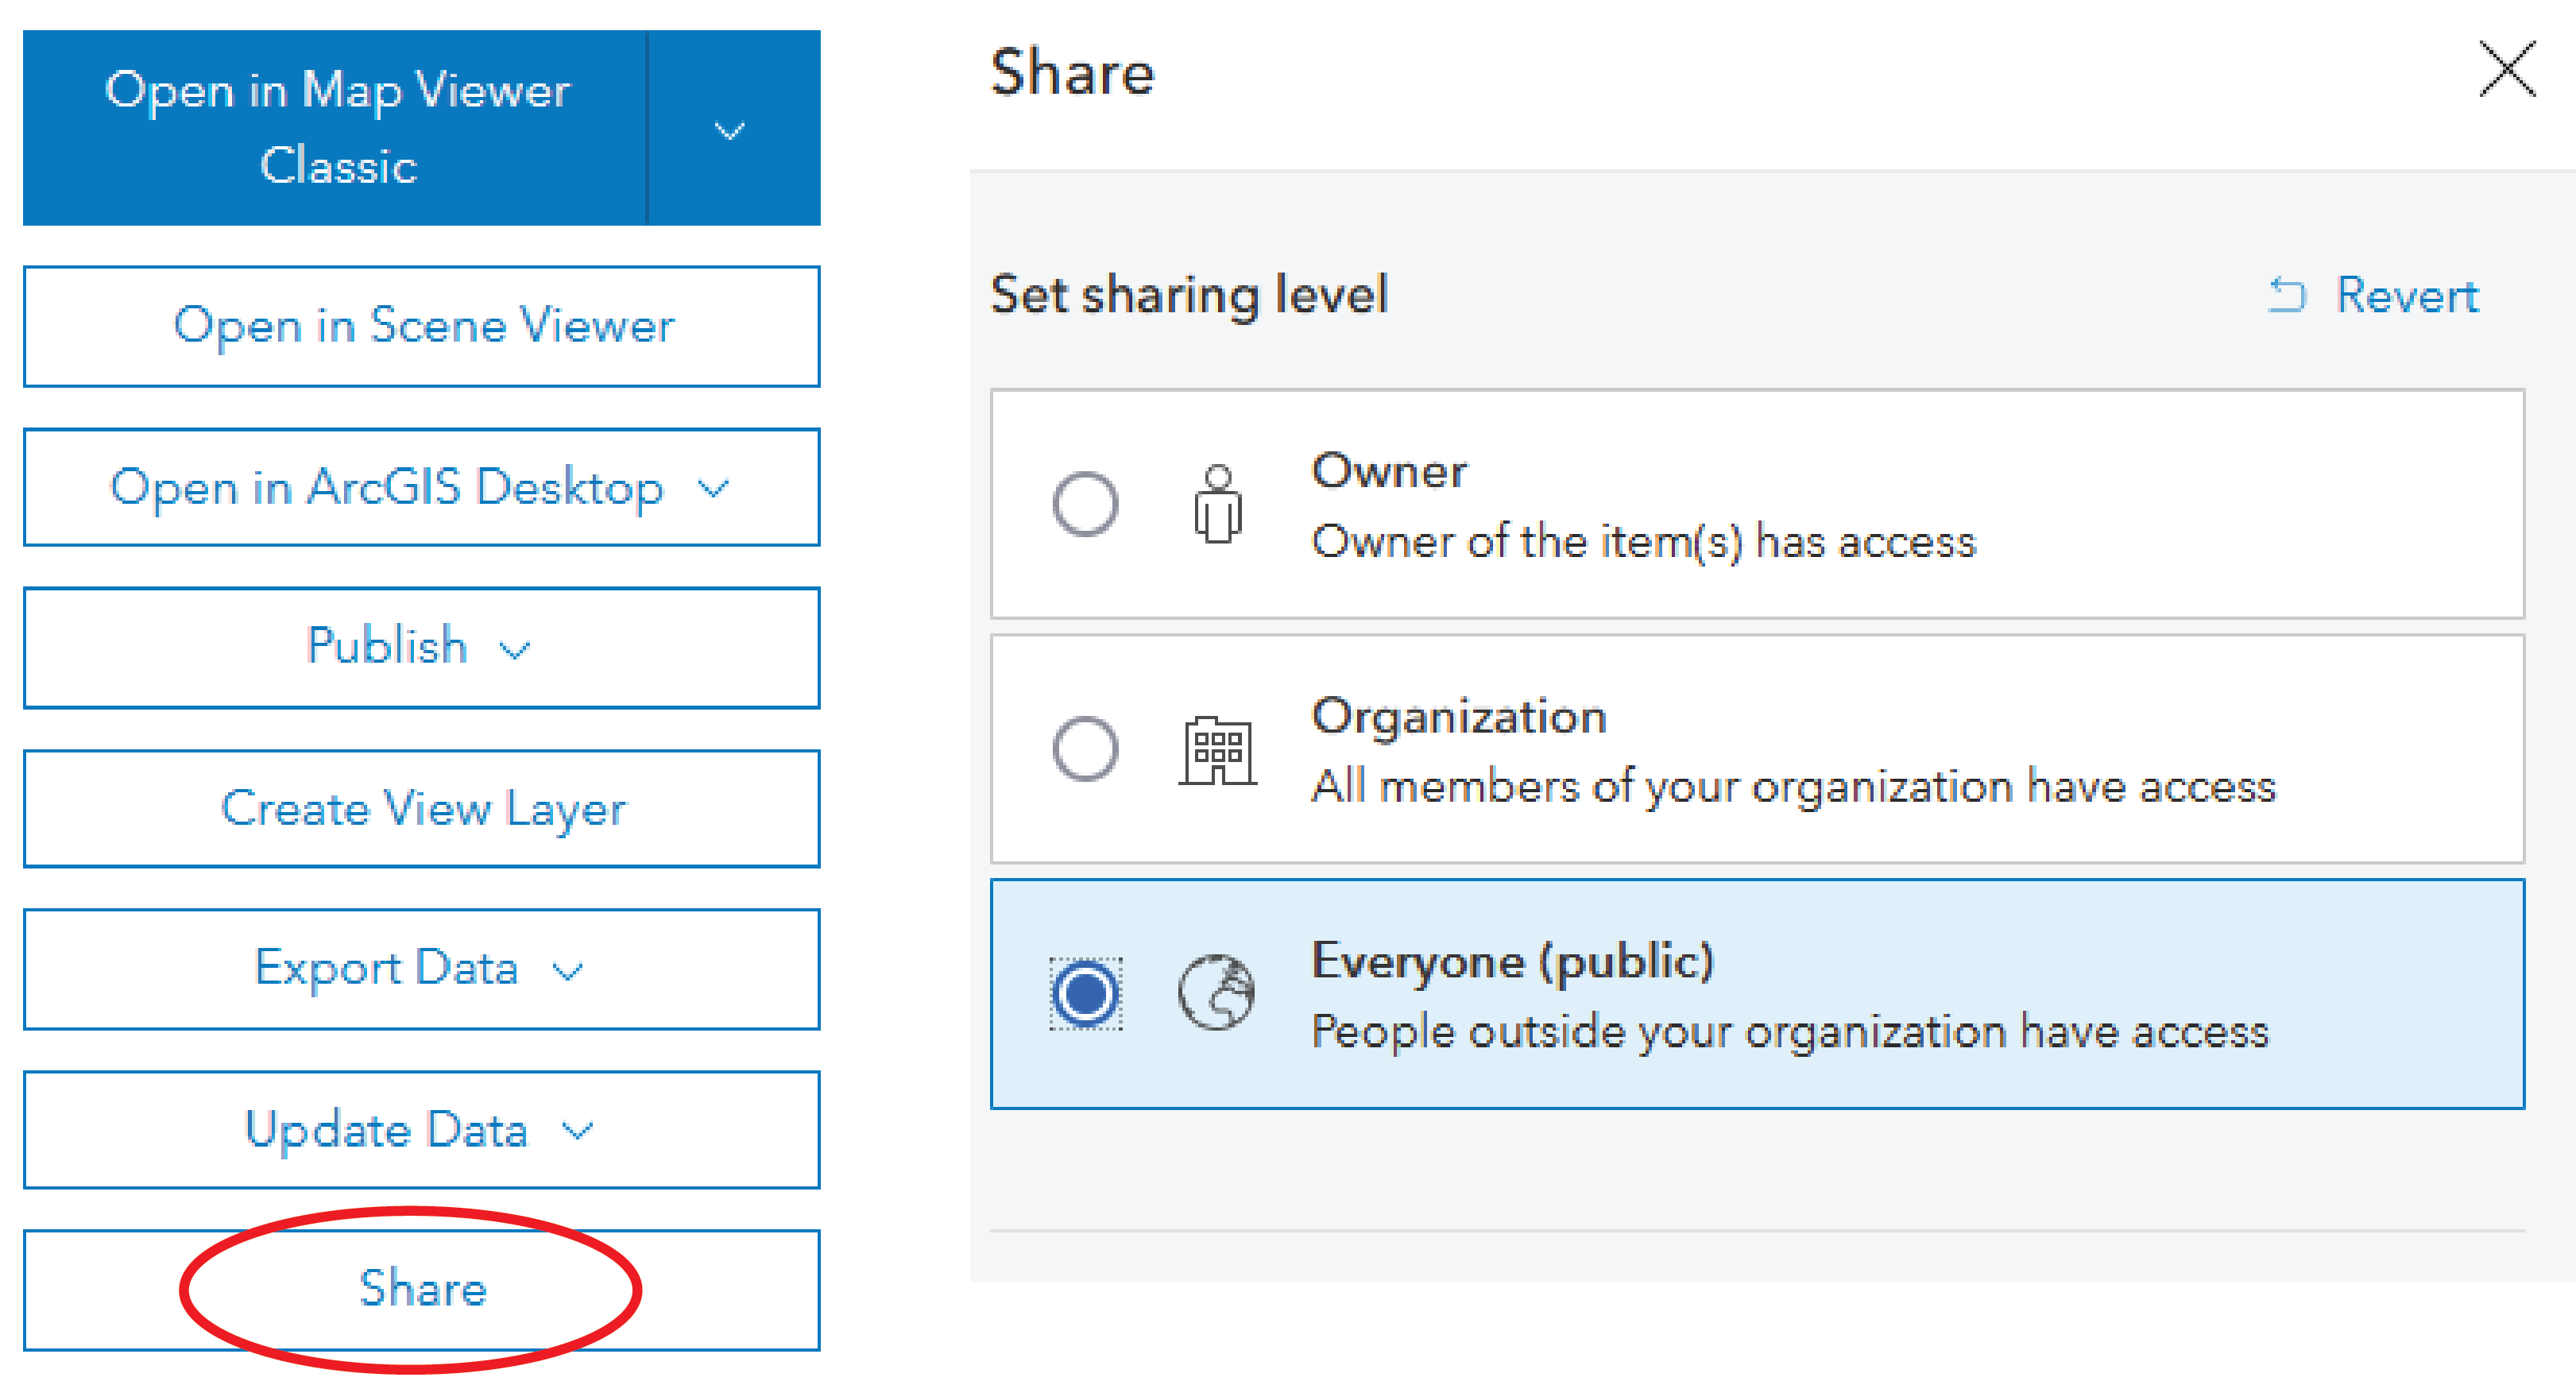
First click on the feature layer, this will pull up a page that has additional details for your feature layer. The right hand side will have a series of buttons, click “Share” and then select “Everyone” and confirm your choice.
From here navigate to the settings tab on the ribbon and tick the box for public data collection then save.
Share to everyone and approve public data collection for the remaining 2 feature layers.
Step 2 Creating the Web Map
This step is collecting layers needed for the virtual censusing and then compiling them into a web map.
The first layer is a perennial network layer, this layer can be created in two ways depending on whether you have access to the riverscapes data warehouse and the area you are sampling has a BRAT run. One way to get a perennial network is by using the National Hydrography Dataset and the Riparian Condition Assessment Toolbox (RCAT) and the other is a simpler way using QGIS and RAVE.
Using NHD and RCAT
The NHD dataset needs to be downloaded from the USGS National Map Downloader. In the “Datasets” tab, check “Hydrography (NHDPlus HR, NHD, WBD)” to start filtering for the product you need.
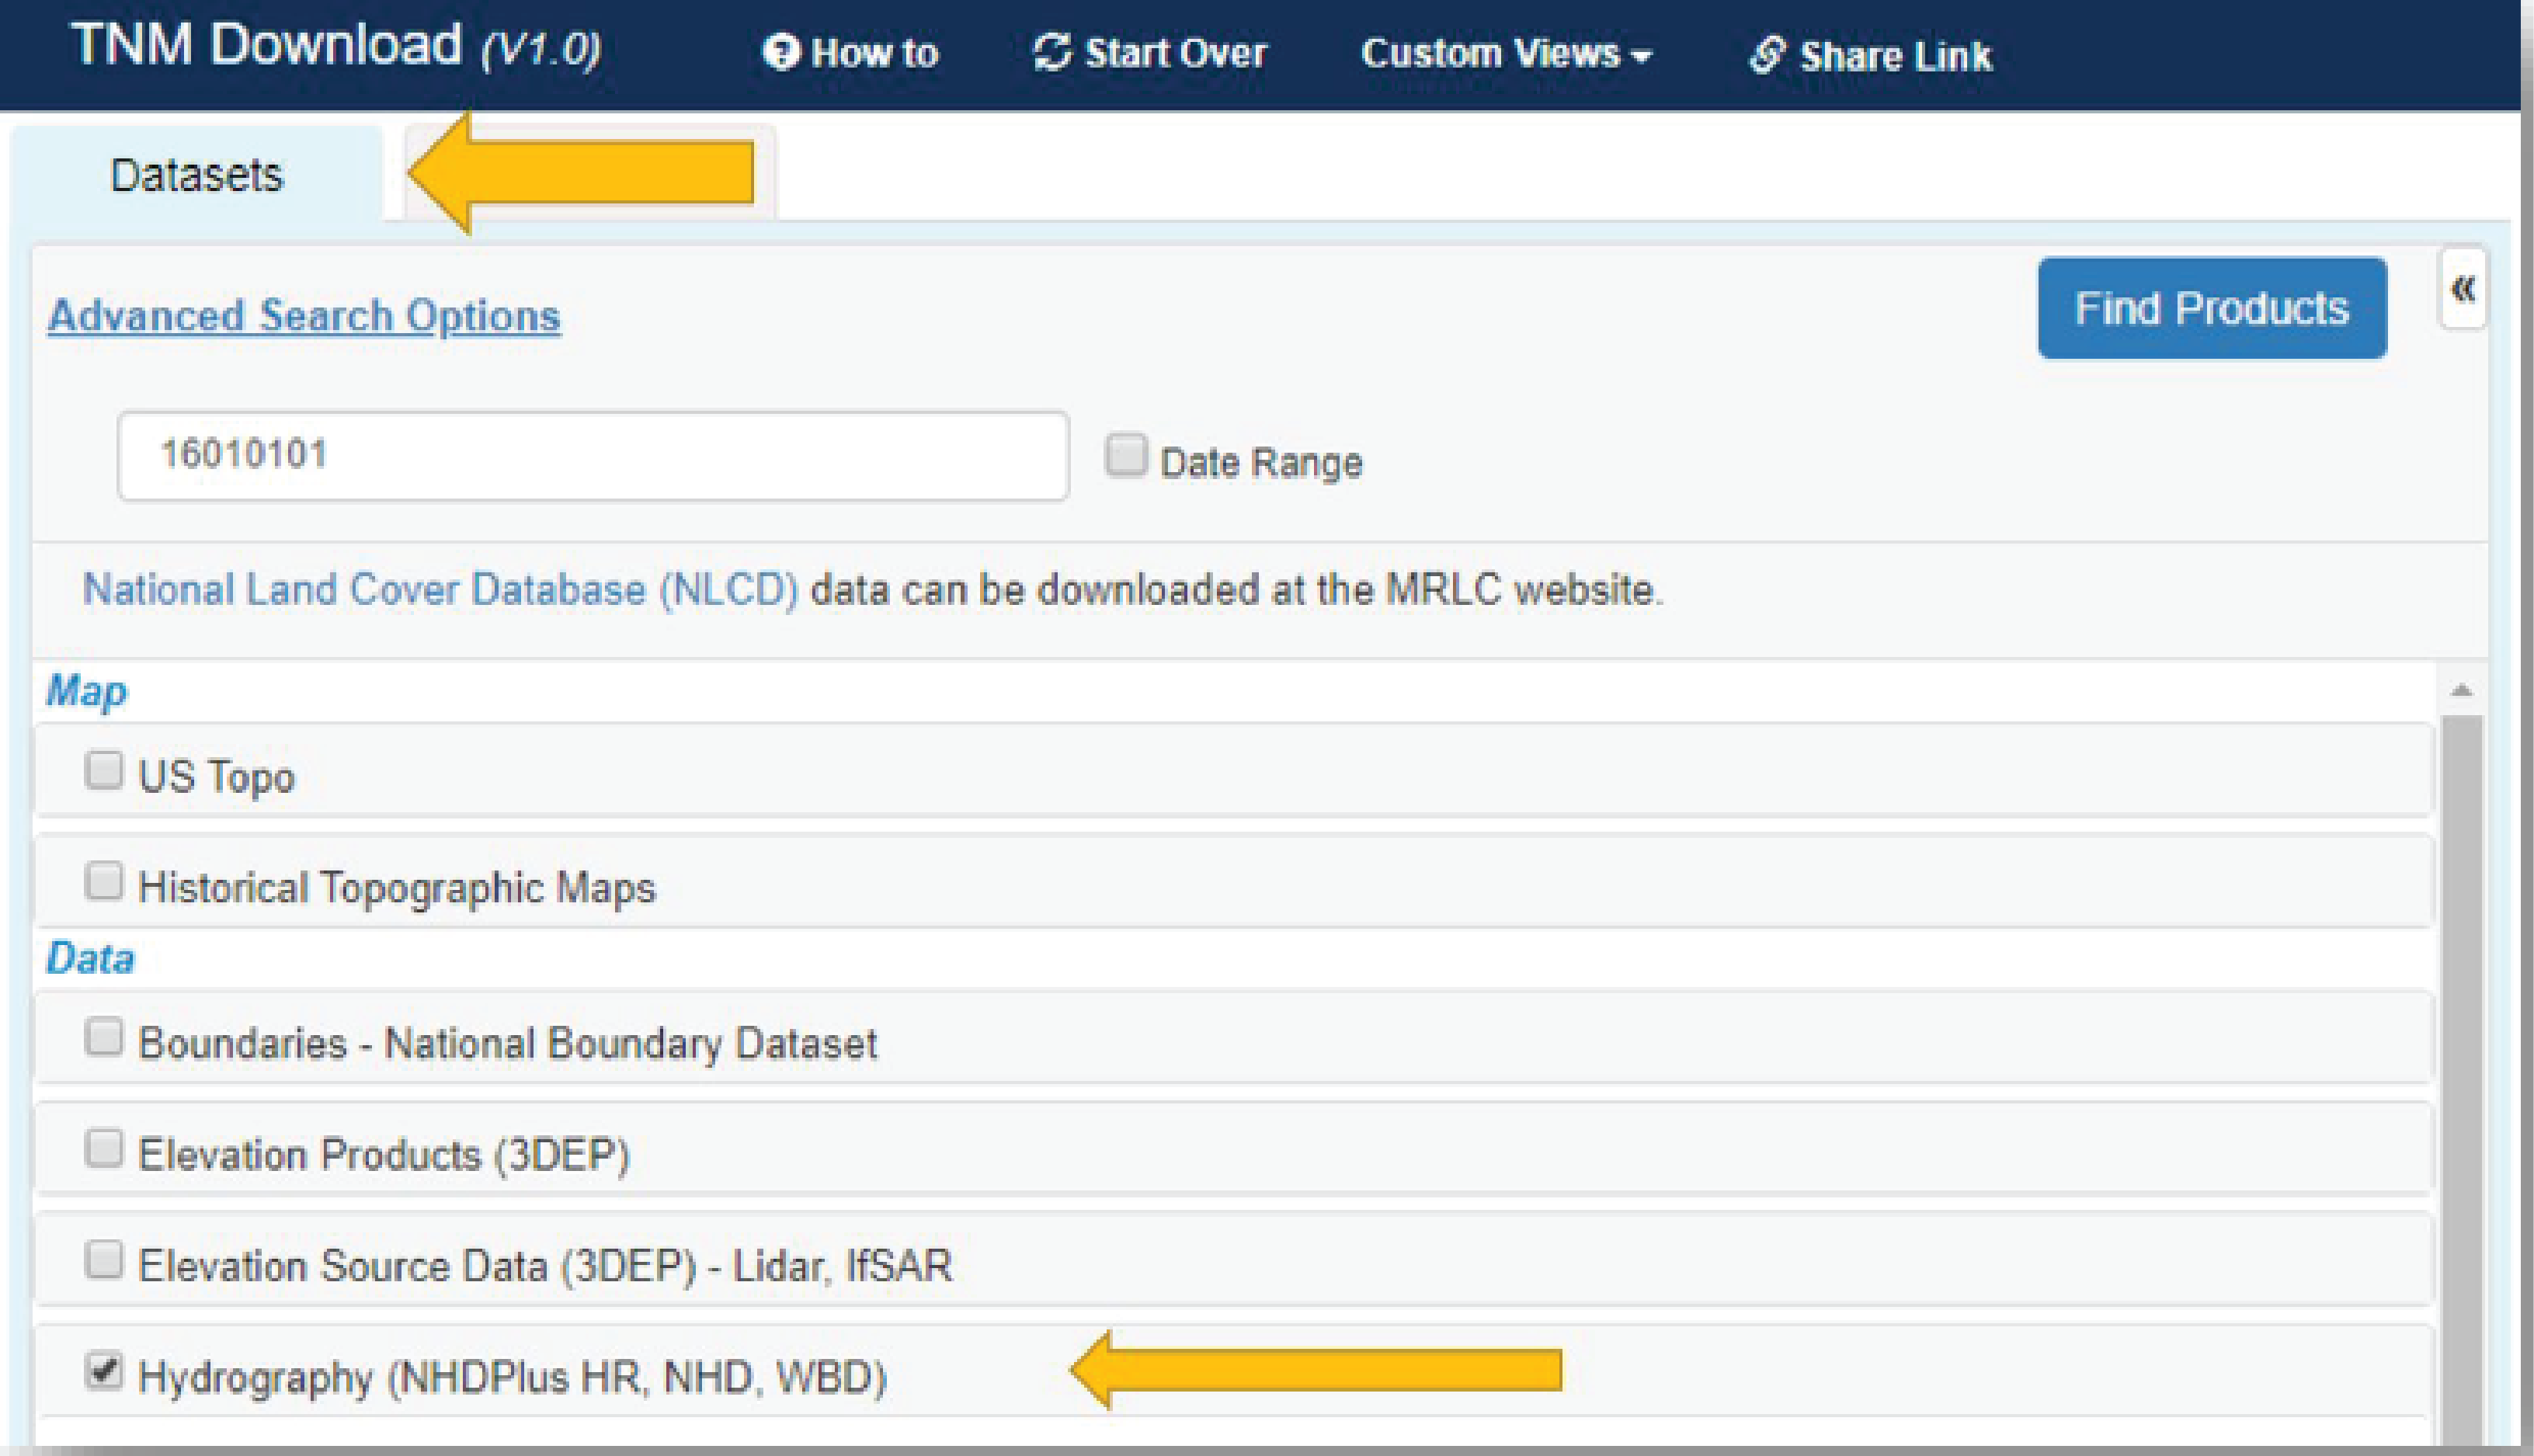
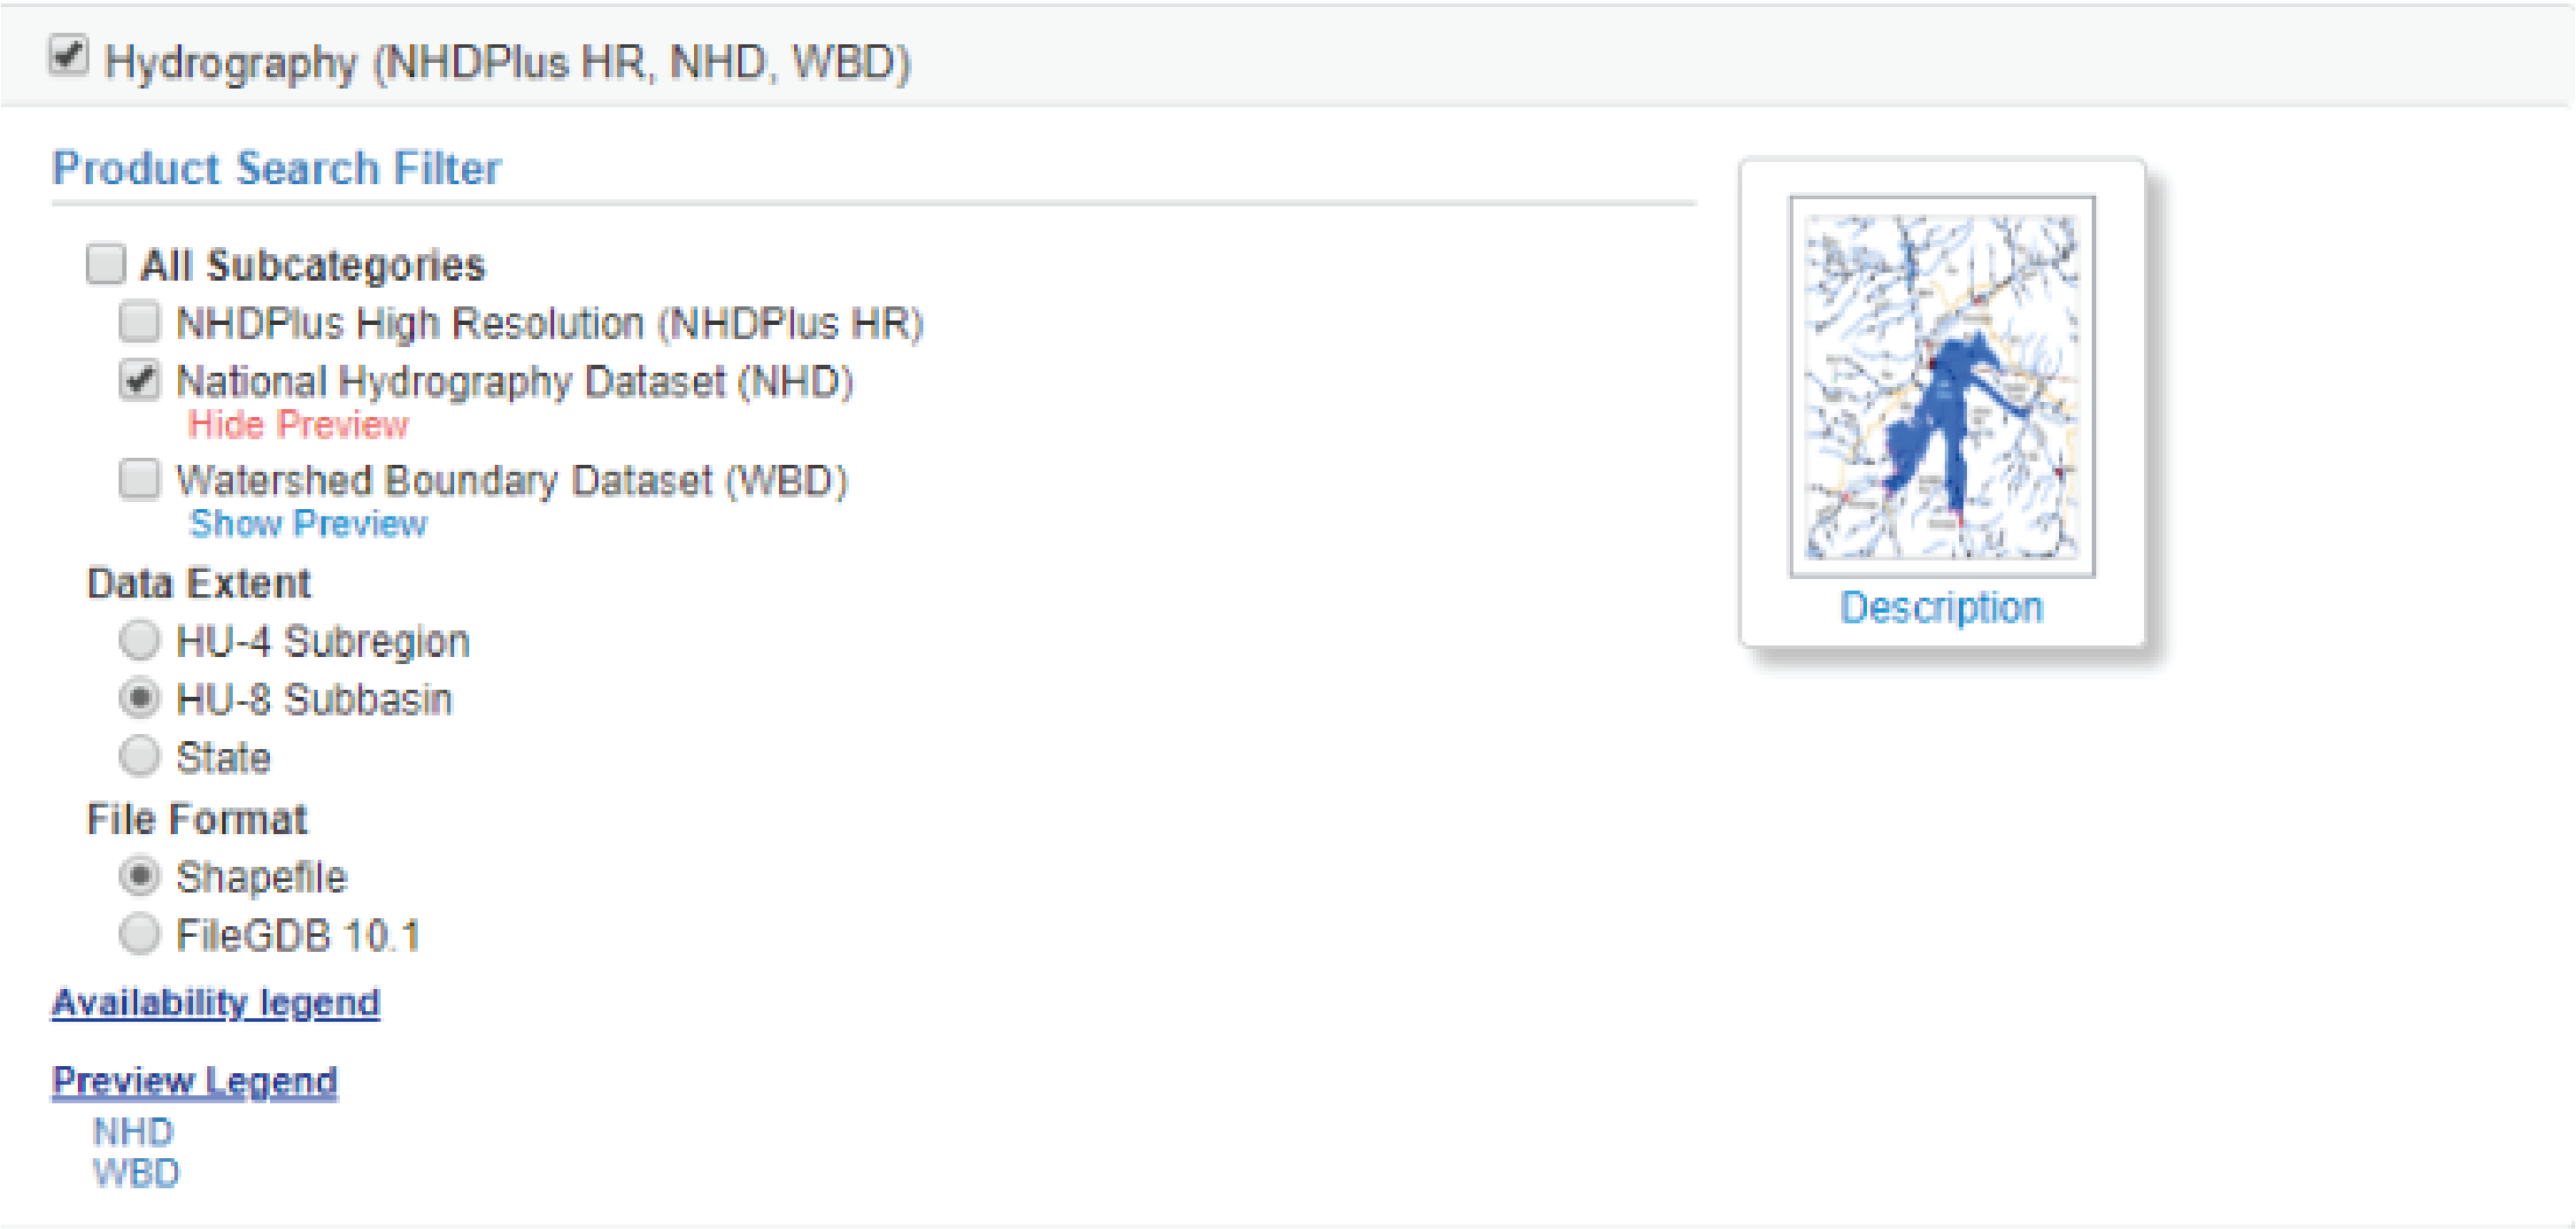
From there searching can be done using HUC 8 ID by clicking on advanced search, or by selecting an extent on the map. Then click “Find Products” and download the NHD dataset for your area.
If your download included multiple NHDLine.shp or NHDFlowline.shp then merge them together into one shapefile before beginning your processing.
Once the file is downloaded and unzipped, some processing needs to be done to create the perennial network which is used for the dam censusing. The NHD Network Builder Tool was designed for this process. It is part of the Riparian Condition Assessment Tools (RCAT) Toolbox. Documentation on running the NHD NBT can be found HERE.
If you cannot get NHD NBT to work there is an alternative where you can export segments of the NHD network with the f codes 33400 (connectors), 46006 (perennial), and 55800 (artificial paths). For artificial paths, you’ll only want to include those that overlap with the NHDArea polygon that comes as part of that download from TNM.
Using QGIS and RAVE
An easier way to retrieve the perennial network for a HUC 8 is by downloading the BRAT project from the Riverscapes Warehouse. These projects have a layer that distinguishes between perennial and non-perennial network. So we can simply open the project using the RAVE plugin for QGIS, and filter for perennial networks. This method requires that you have access to the warehouse and the necessary BRAT run for the HUC you are working in.
To begin, ensure you have the QRAVE plugin. If you don’t already have it you can follow the steps here to download this plugin. This page also goes over downloading QGIS.
Once you have a BRAT project downloaded from the Riverscapes Warehouse, use the RAVE plugin to open the .rs file in the unzipped project.
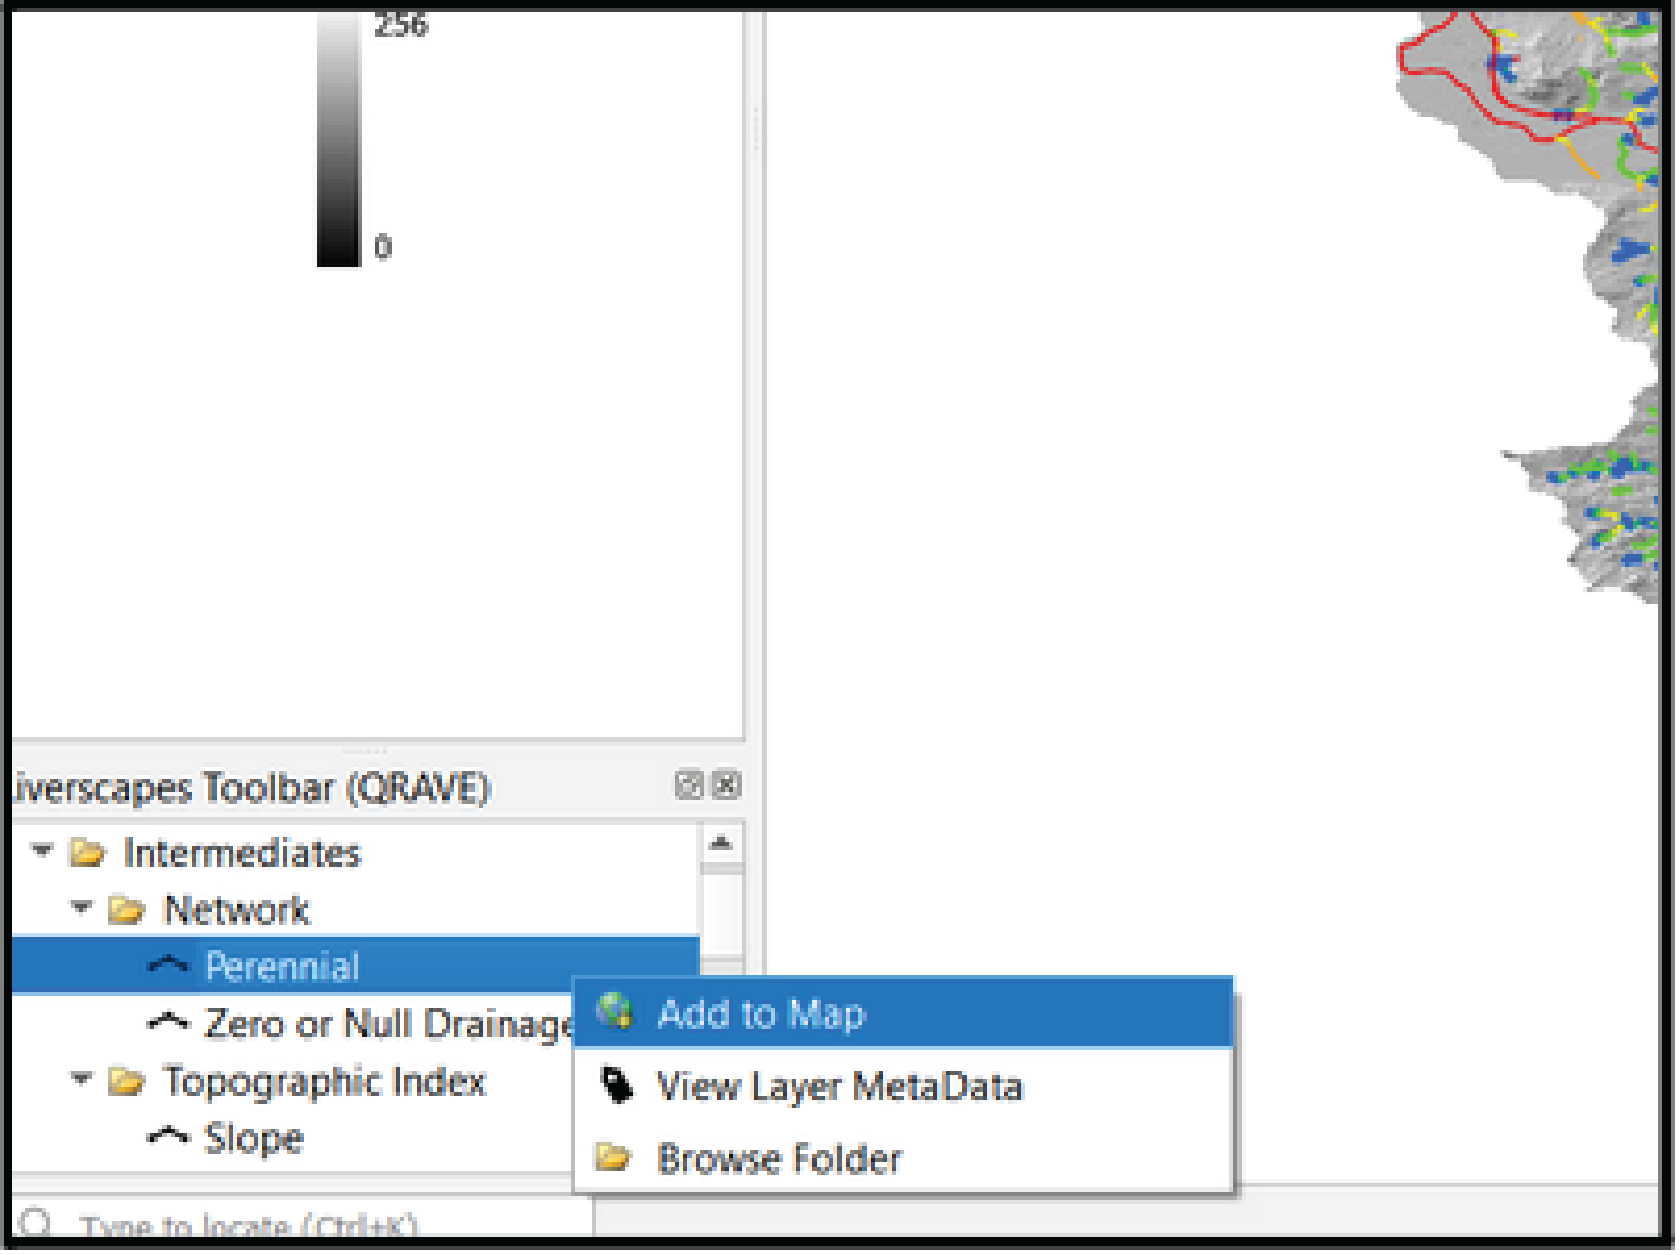
Add the perennial network layer to your QGIS project. This layer can be found under the intermediates folder in the Riverscapes Toolbar.
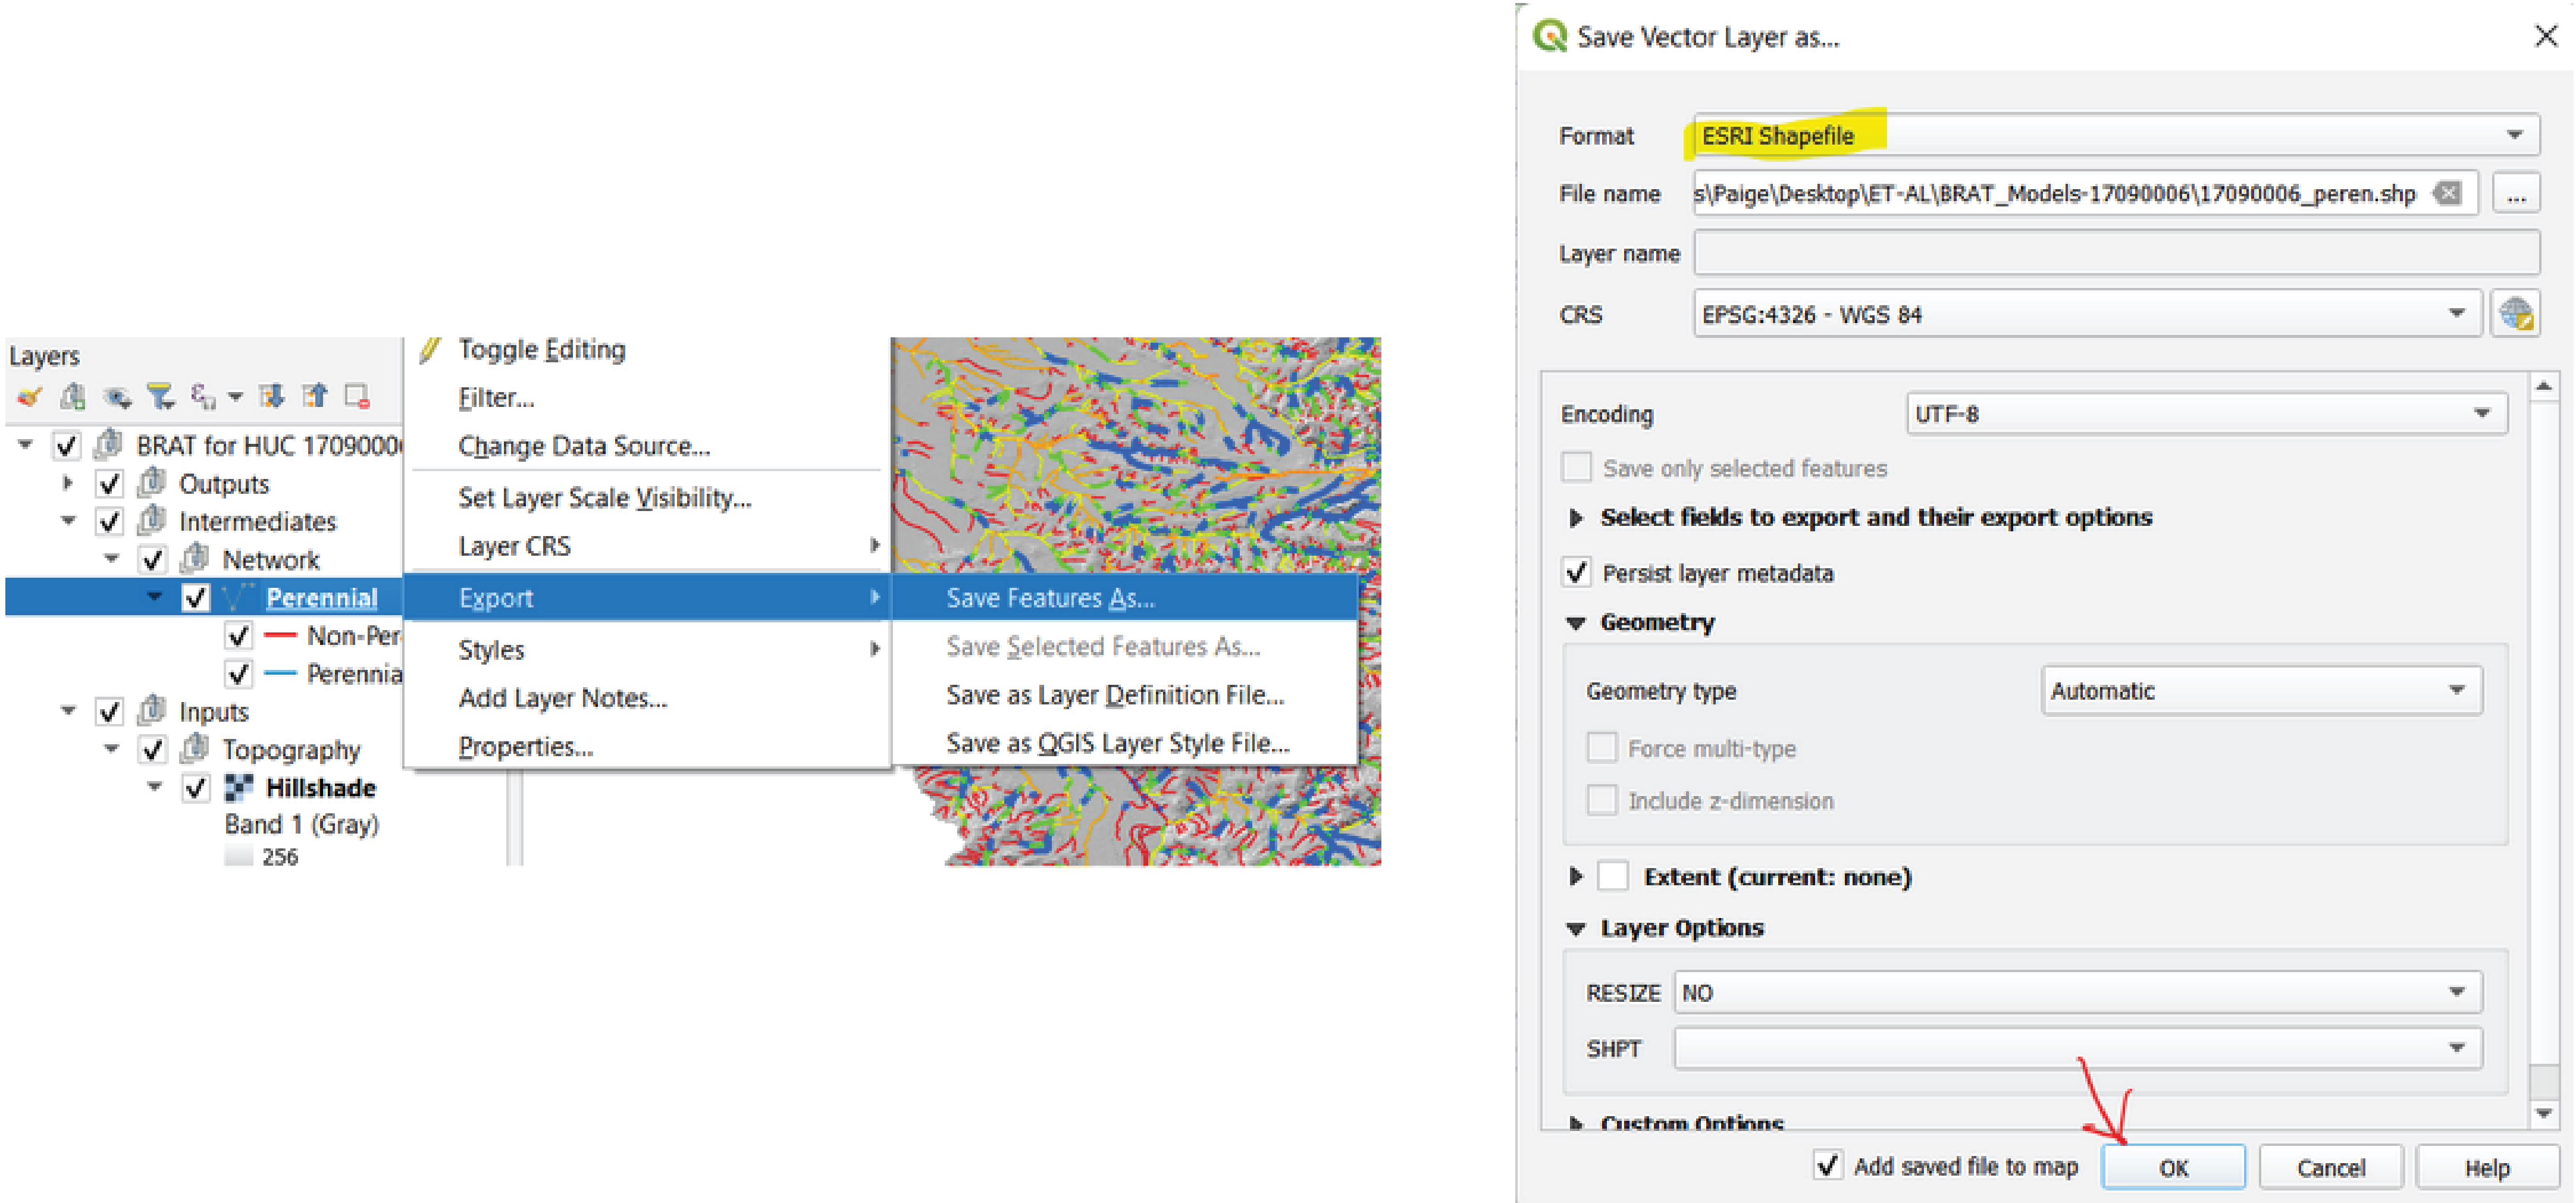
After the layer has been added to the map, it needs to be exported as a shapefile so that it can be edited.
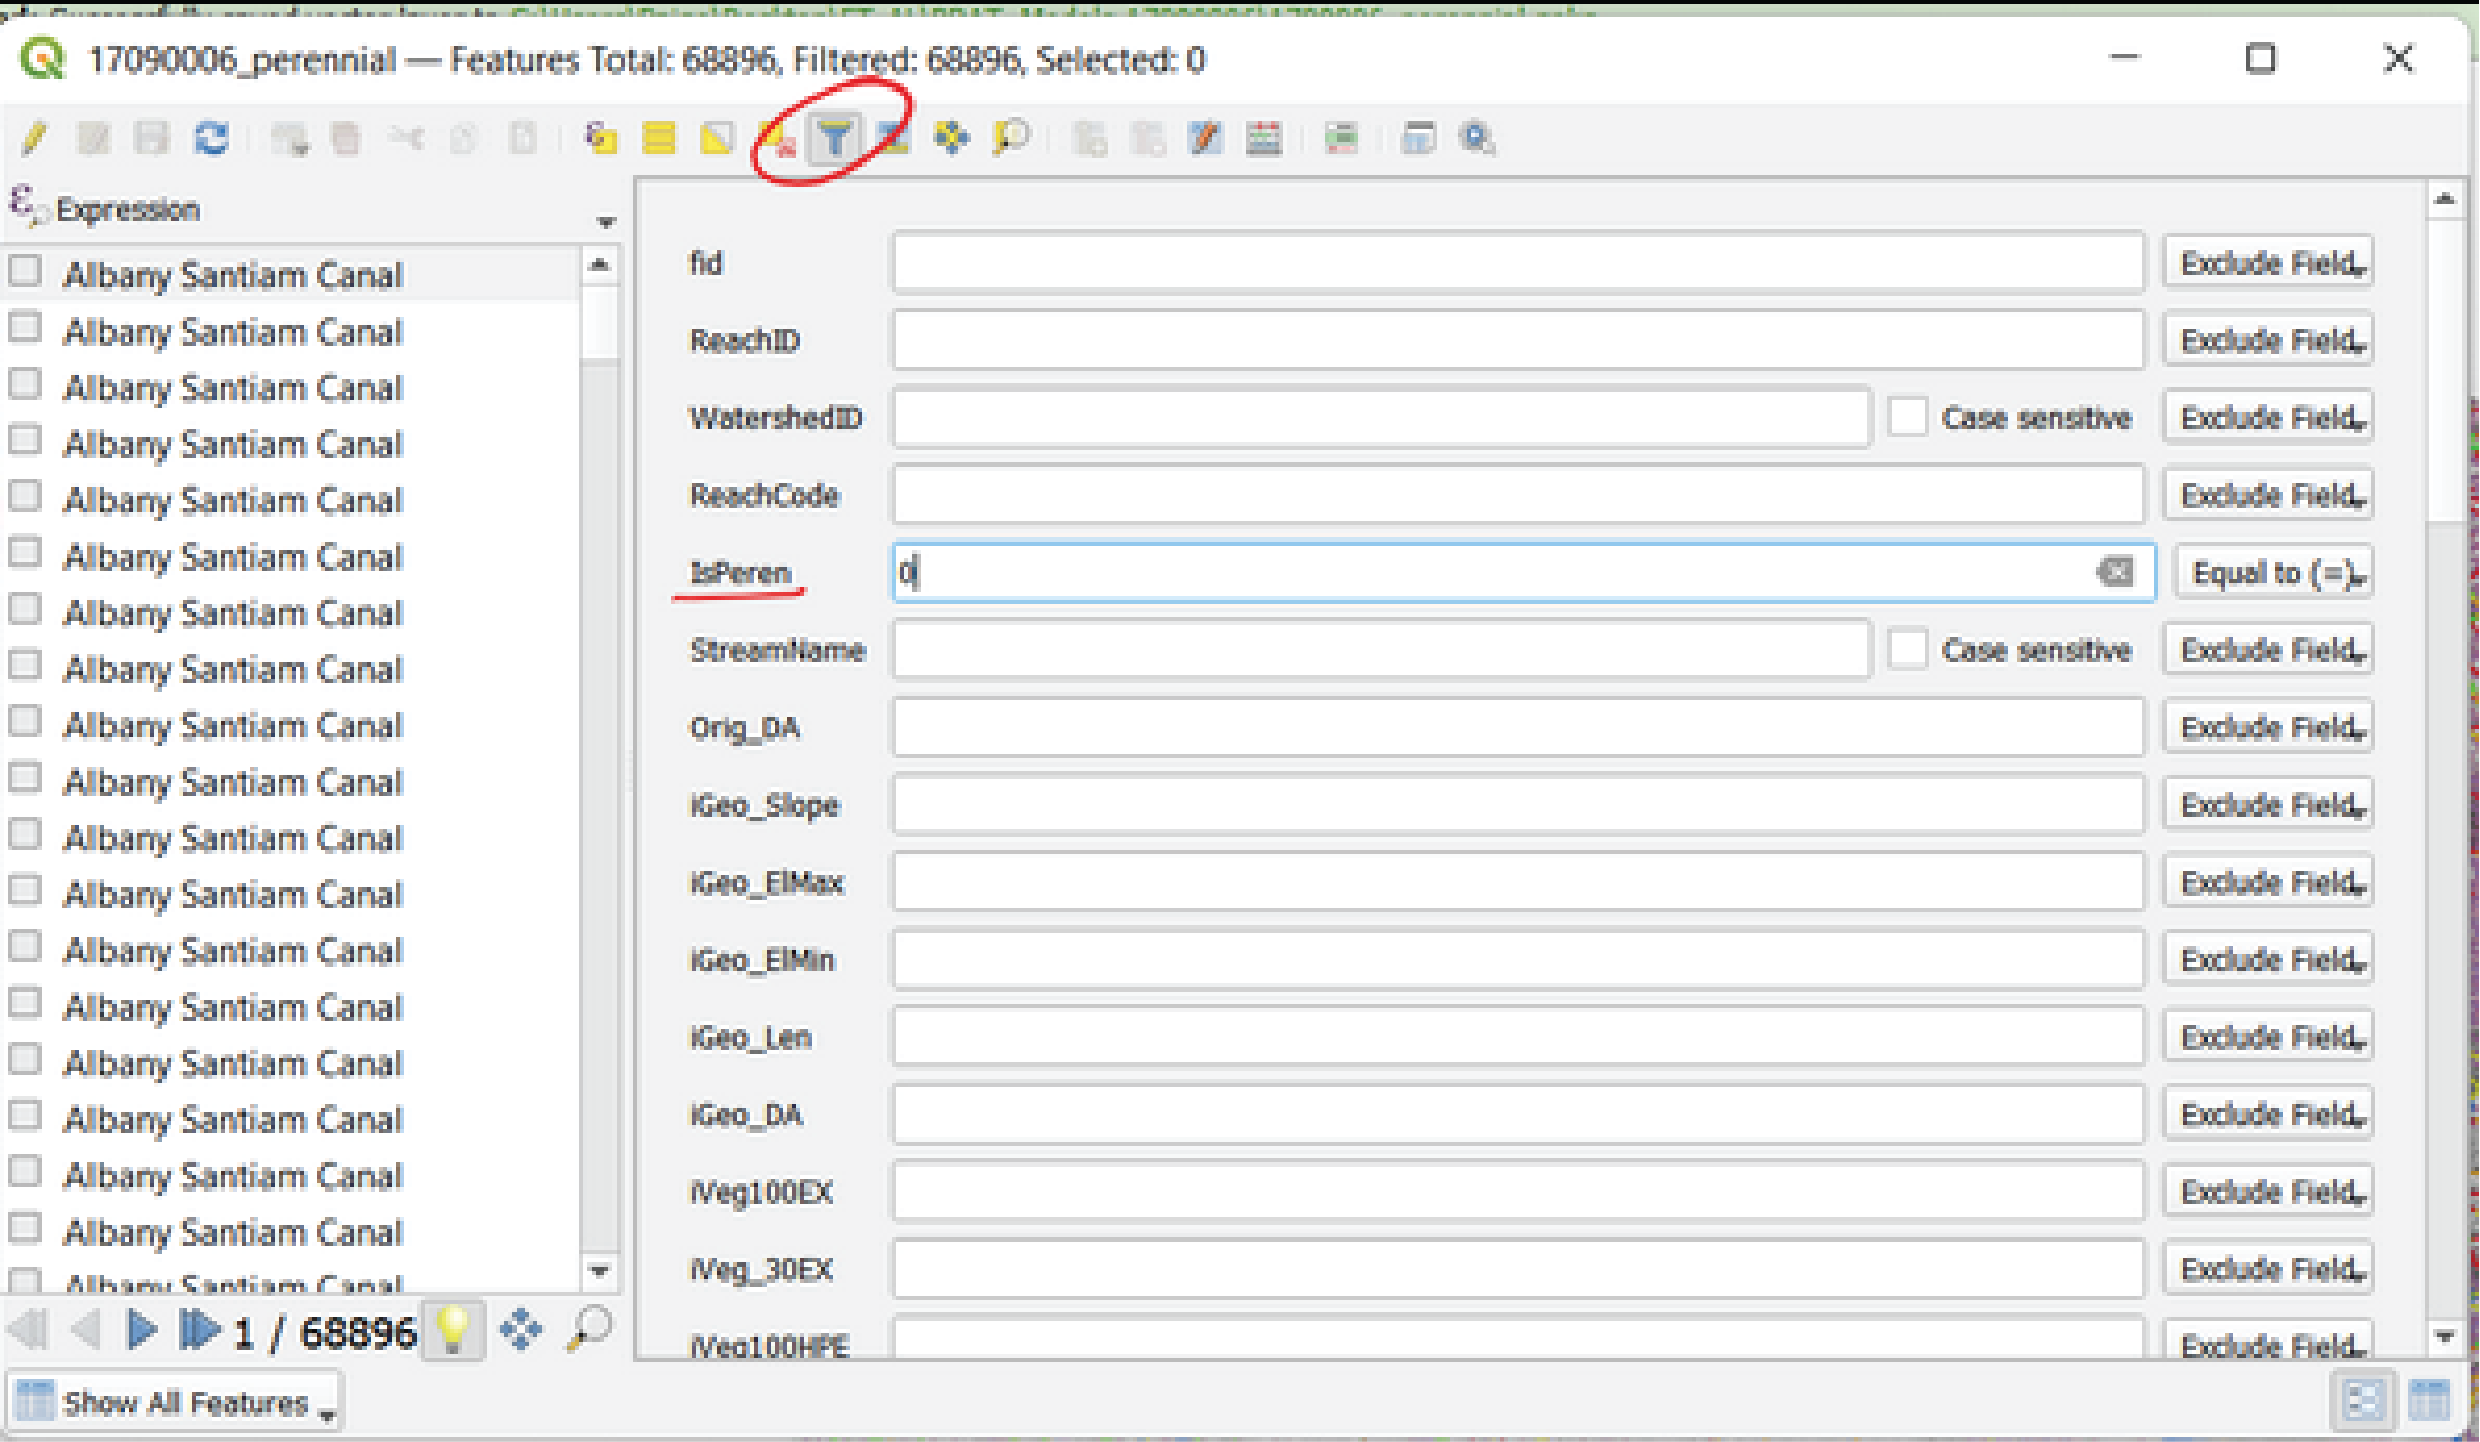
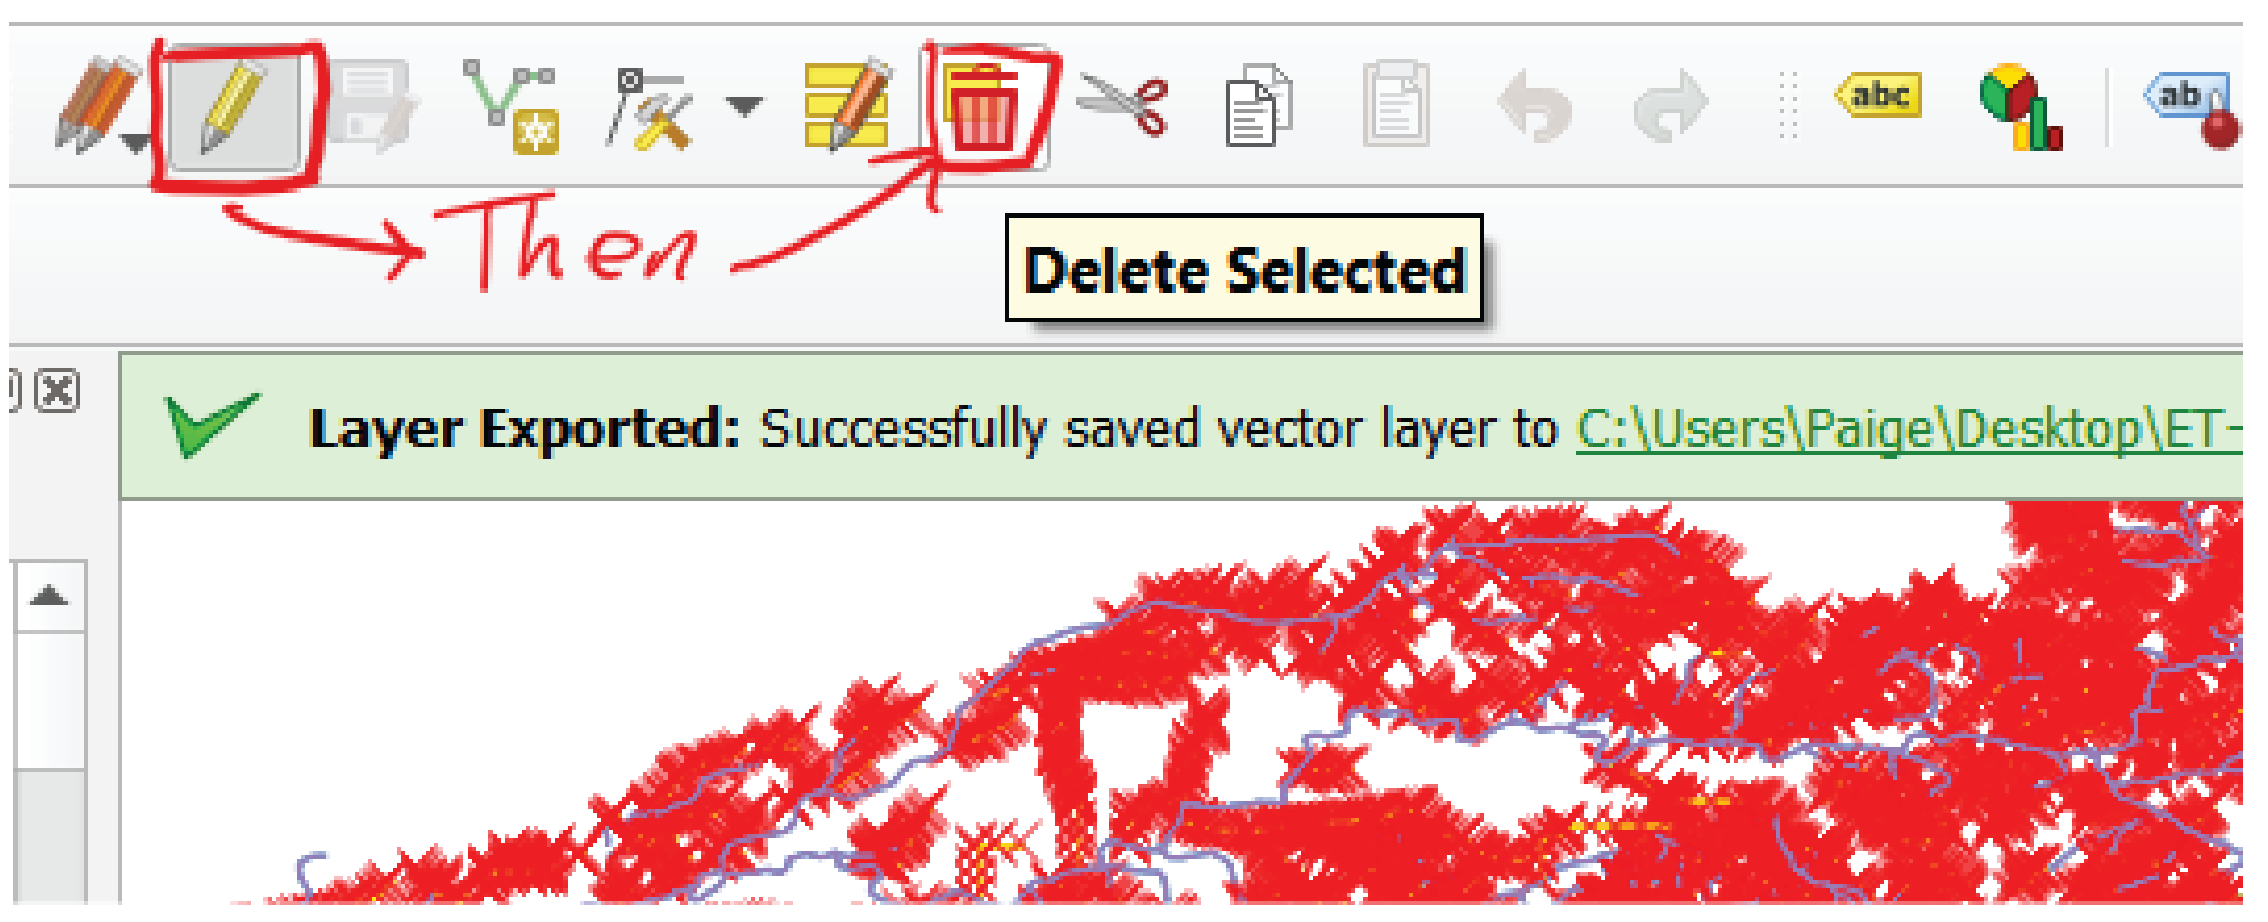
Once this shapefile has been exported, open the attribute table by right clicking and selecting attribute table. The filter the data by clicking the funnel icon and selecting features that aren’t perennial. This criteria is selecting IsPeren = 0.
Once these features are selected, click the perennial layer in the layers pane then toggle editing. Delete the selected features and then save your edits and exit the editing session.
This is a good time to take your network and clip it to the appropriate extent if you are not running a census on the whole HUC 8 watershed.
Whether you retrieved your perennial layer by using RCAT and TNM or RAVE and QGIS you will have to pull the shapefile into a folder and compress the folder for upload to ArcGIS Online. If you have other files you need then also upload them at this time. Additional files could include a boundary for the extent of your censusing, an imagery layer, or other layers you may need for your specific project.
To upload your file to ArcGIS online go to the content tab of ArcGIS online and then click “Add Item” then “From your computer” then “Choose File” and select your new zipped perennial network file.
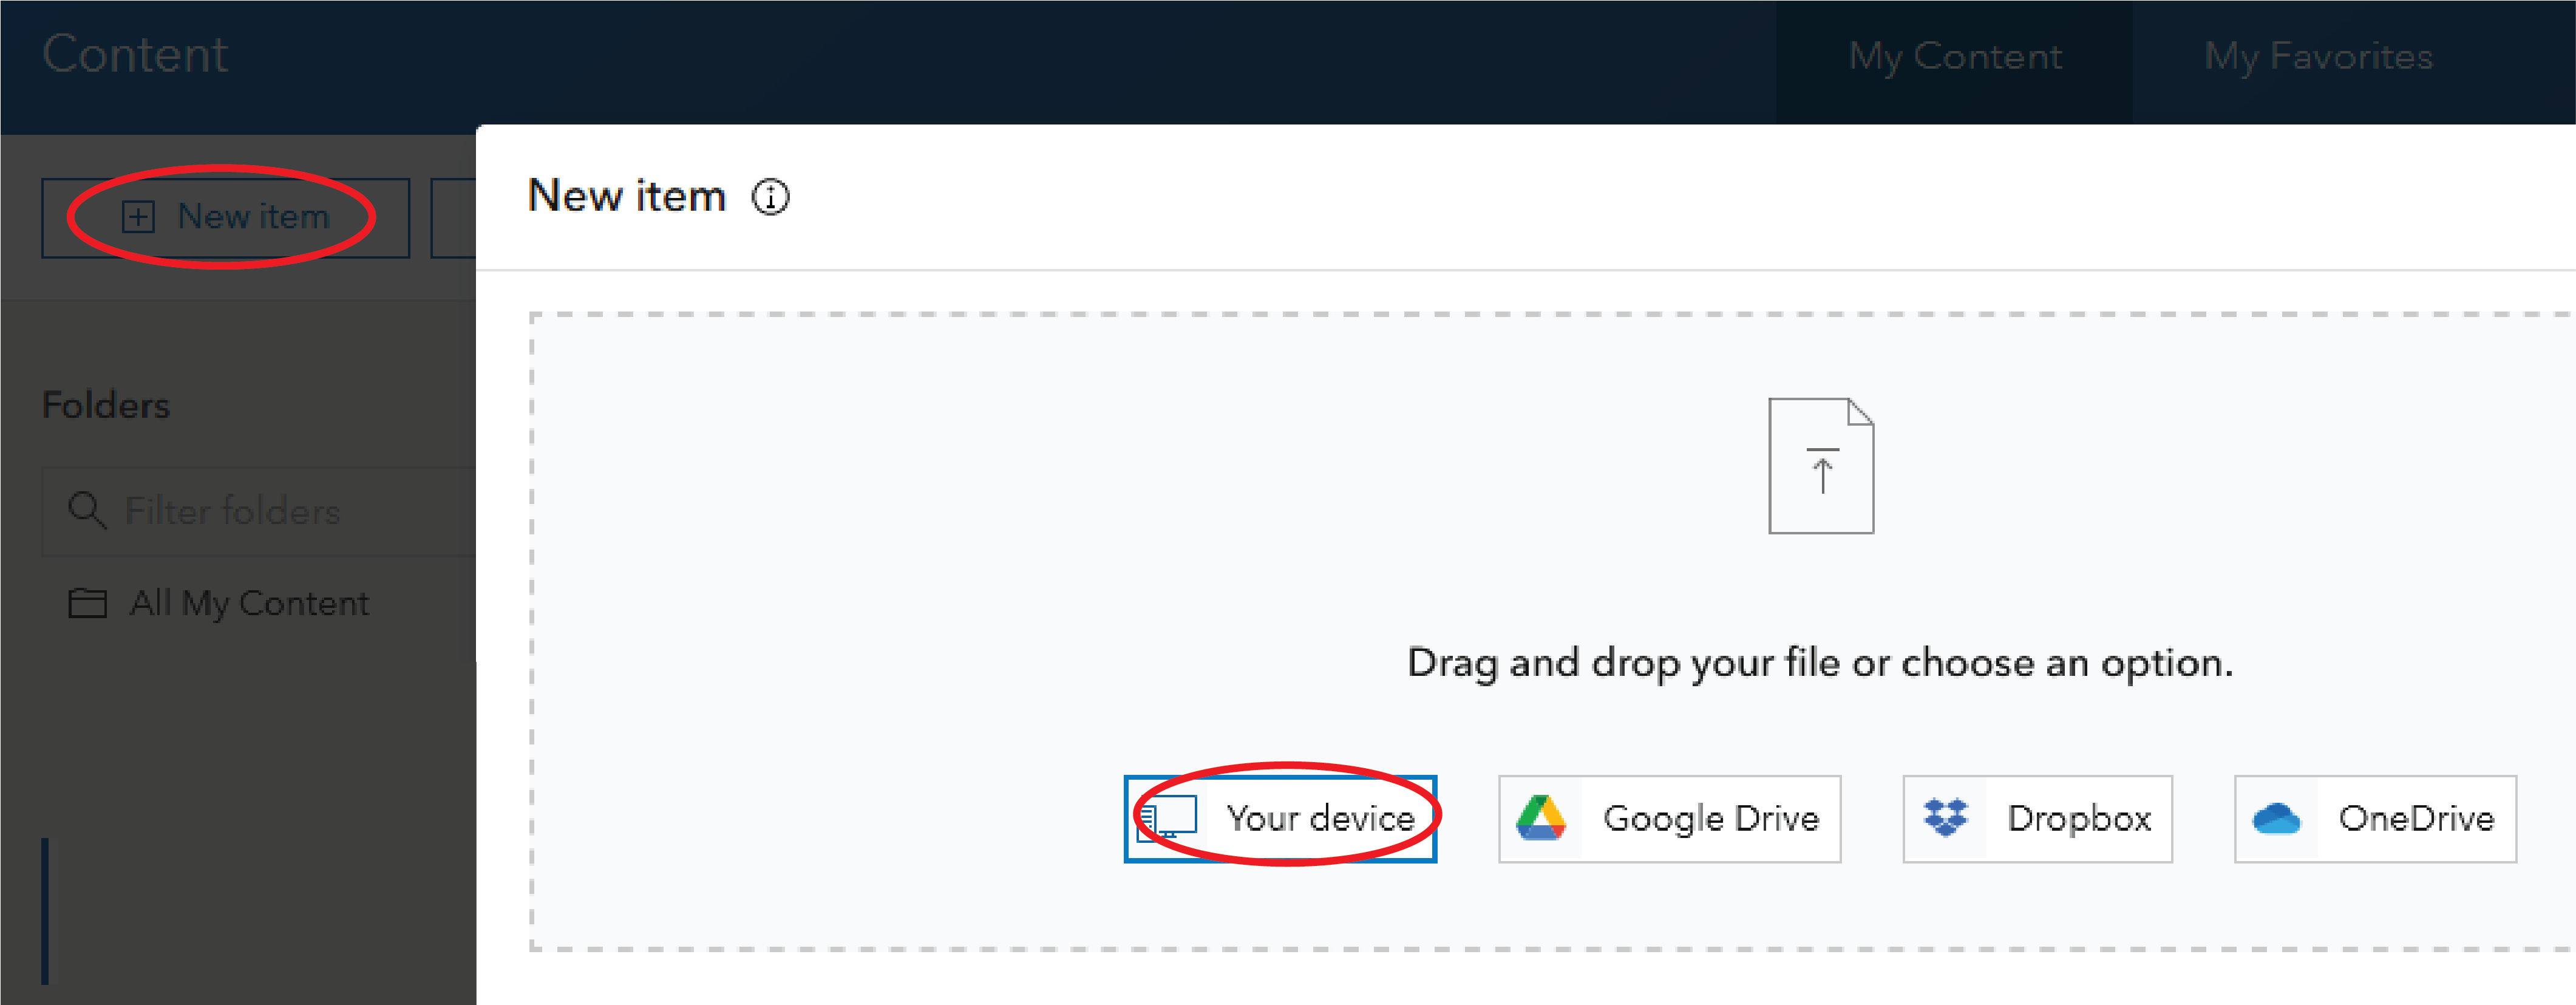
Confirm that the item type is shapefile and then tick the bubble to add your zip and create a hosted feature layer. Name your file something relevant and clear, then save. As with the feature layers for your survey this layer also needs to be shared to everyone. As a reminder this can be done by clicking on the feature layer and selecting share then everyone.
Now that the perennial network layer is uploaded, survey created, and both shared with everyone, making a web map can begin. If you added other layers also share these with everyone
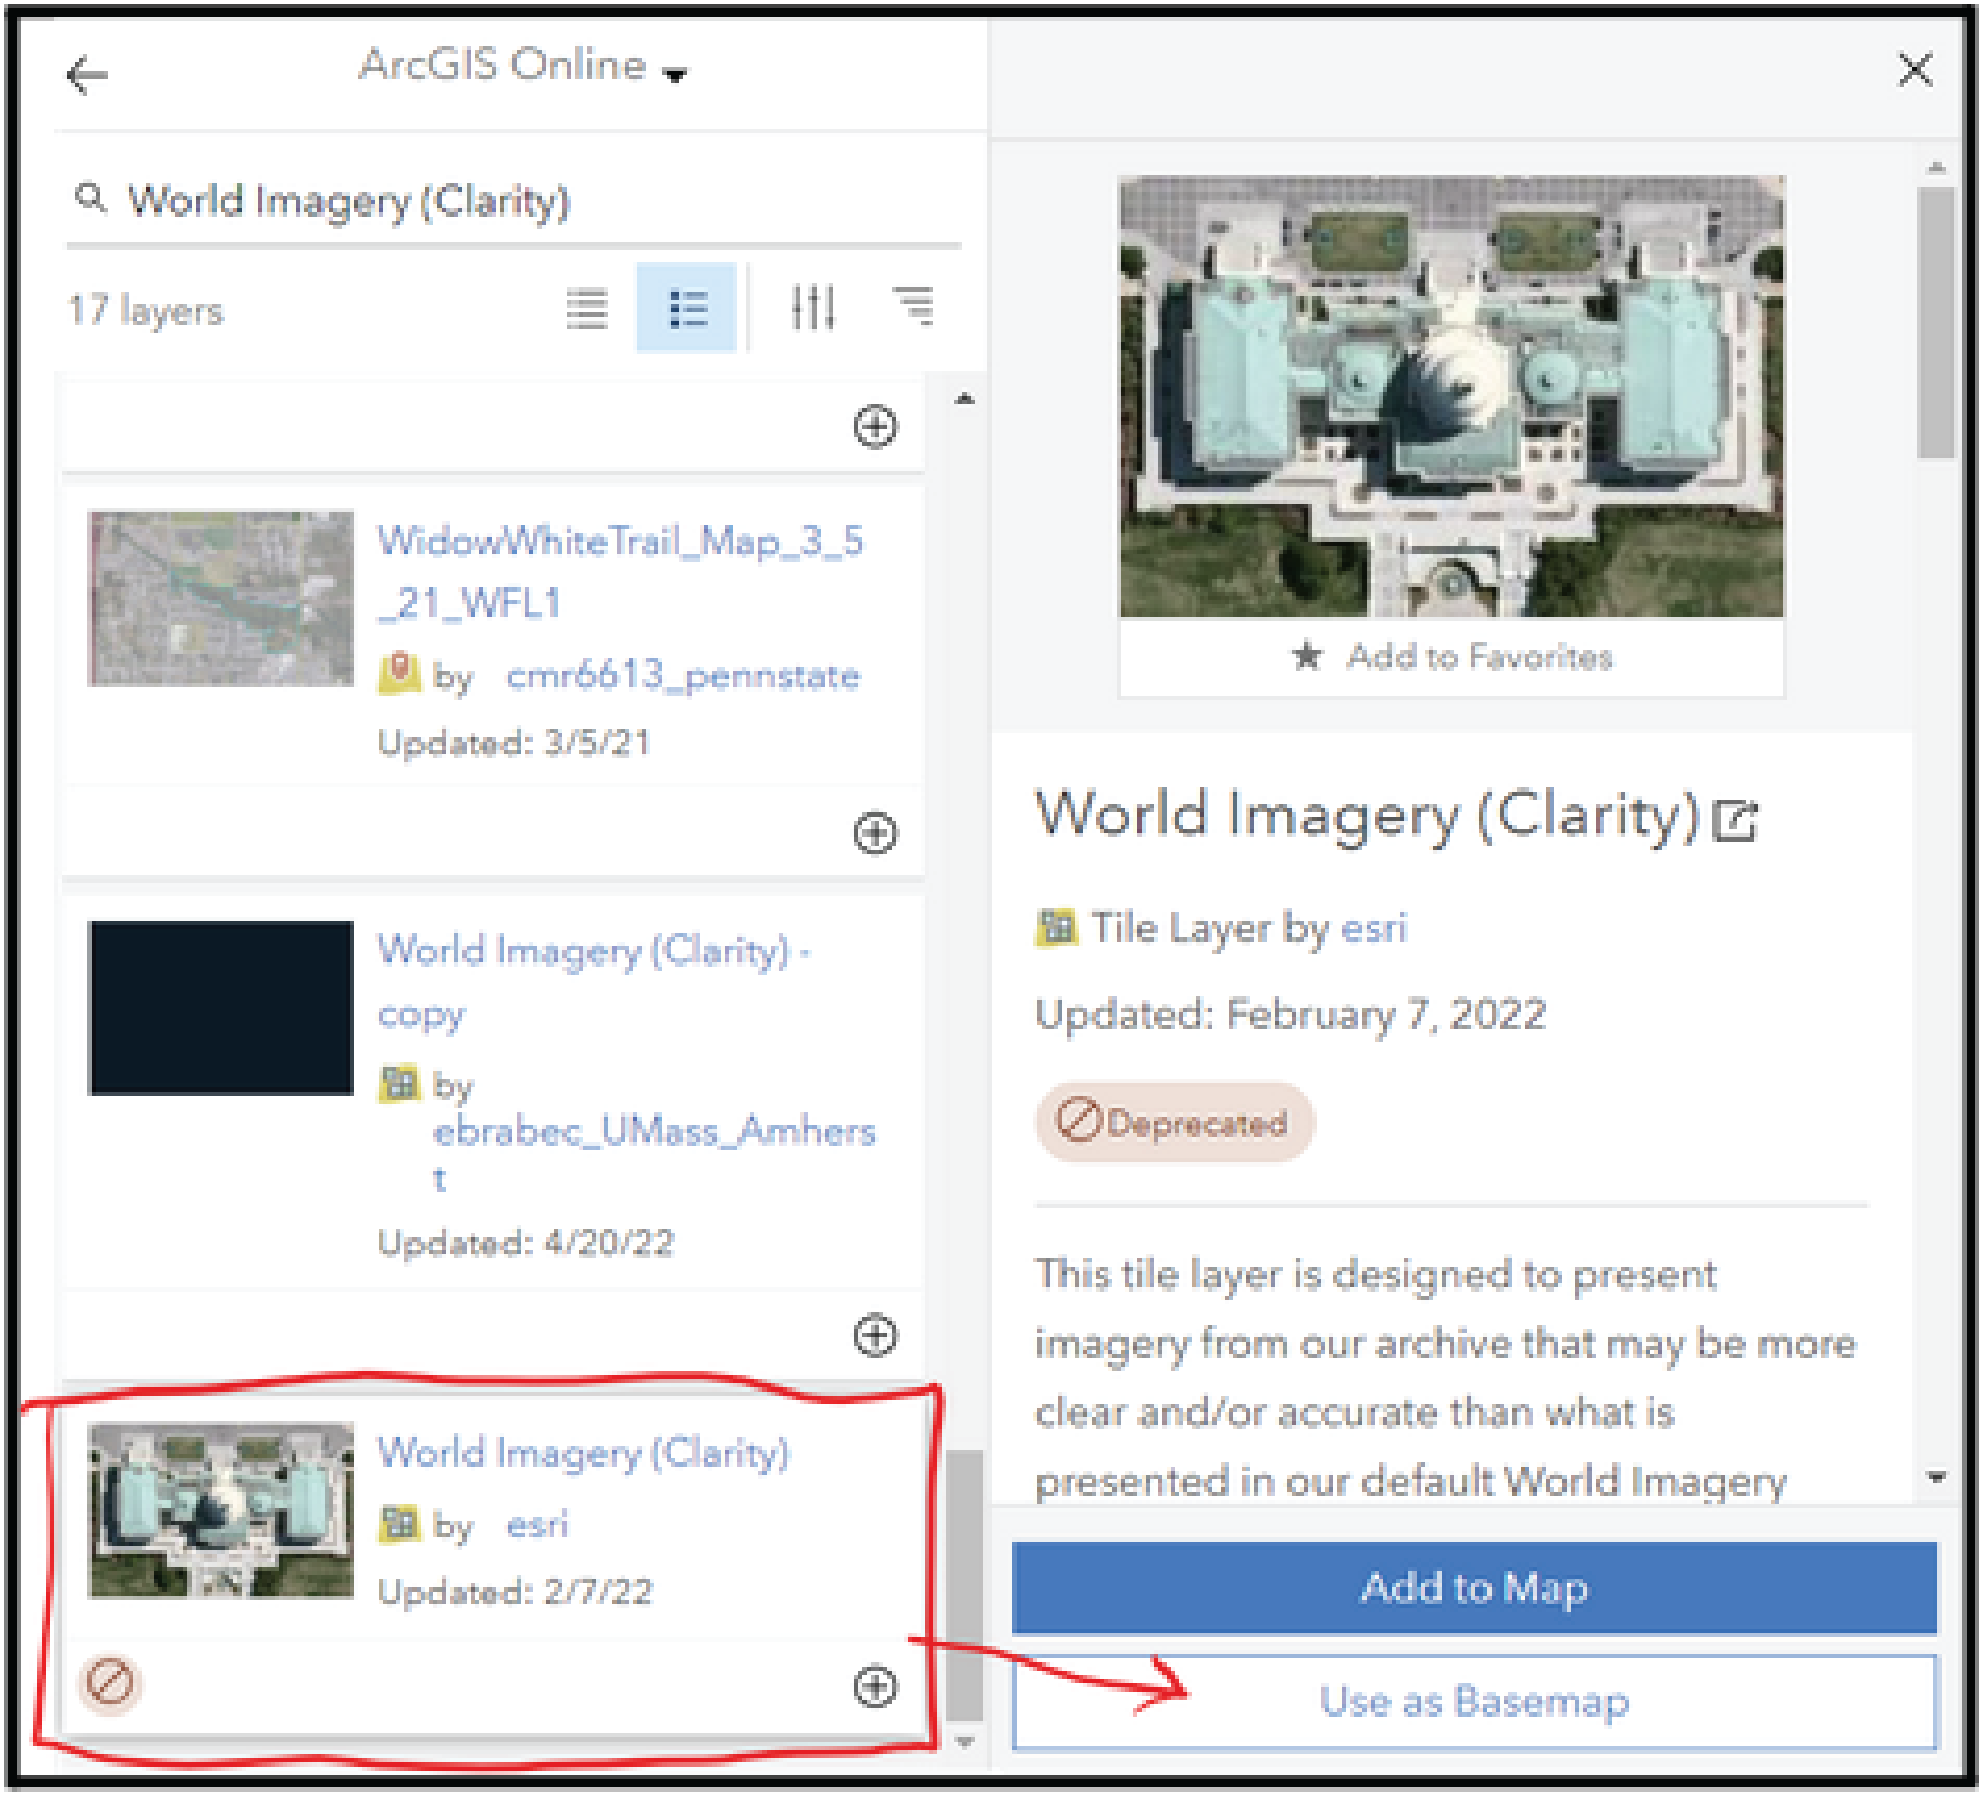
Once you’ve shared the perennial network with everyone click on the “Open in Map Viewer Classic” from the feature layer’s Overview. This will display the perennial network on a map, the next step is to add a basemap to use for censusing. This is done by clicking the “Add” dropdown then choose “Search for Layers.” Click on the “My Content” dropdown and choose “ArcGIS Online.”
In the search bar, type “World Imagery (Clarity)” and click on “World Imagery (Clarity)” which is made by ESRI. At the bottom of the new extended window, click “Use as Basemap.”
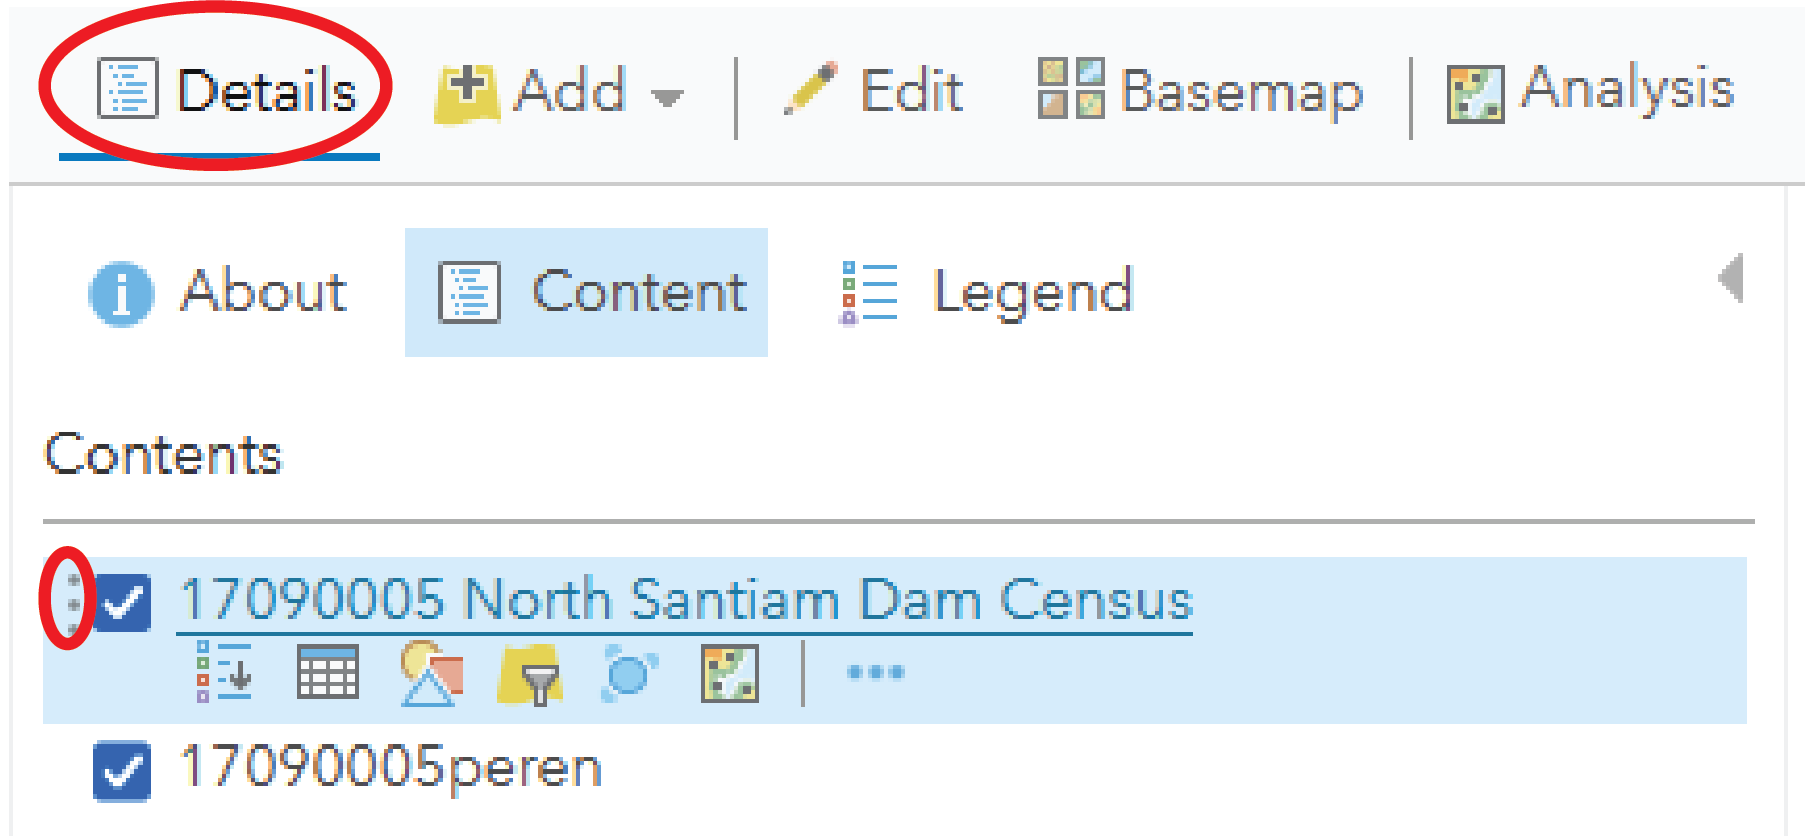
Now we can add the survey feature layer to the map. Click back on the “ArcGIS Online” dropdown and choose “My Content.” In the search bar type in the name of the survey that was created earlier. Add the feature layer that is only the name, not [Your Survey Name]_fieldworker or [Your Survey Name]_stakeholder. You can add the layer by clicking the + sign. Other layers should also be added at this time. Simply search their names under the “My Content” tab and add.
Click on the “Details” tab in the top left of the page, the survey should be the top layer in the map so the points show up on top of the perennial network. If it is not the top layer hover over it until 3 dots appear to the left of the layer name, click and drag to move the layer above the perennial network layer.
Move the map so that your focus area is in the center of the map, when the map is published as an app this is the view that will automatically load.
Step 3 Creating a Web App
First you will need to share your web map as a web app. Click the share button.
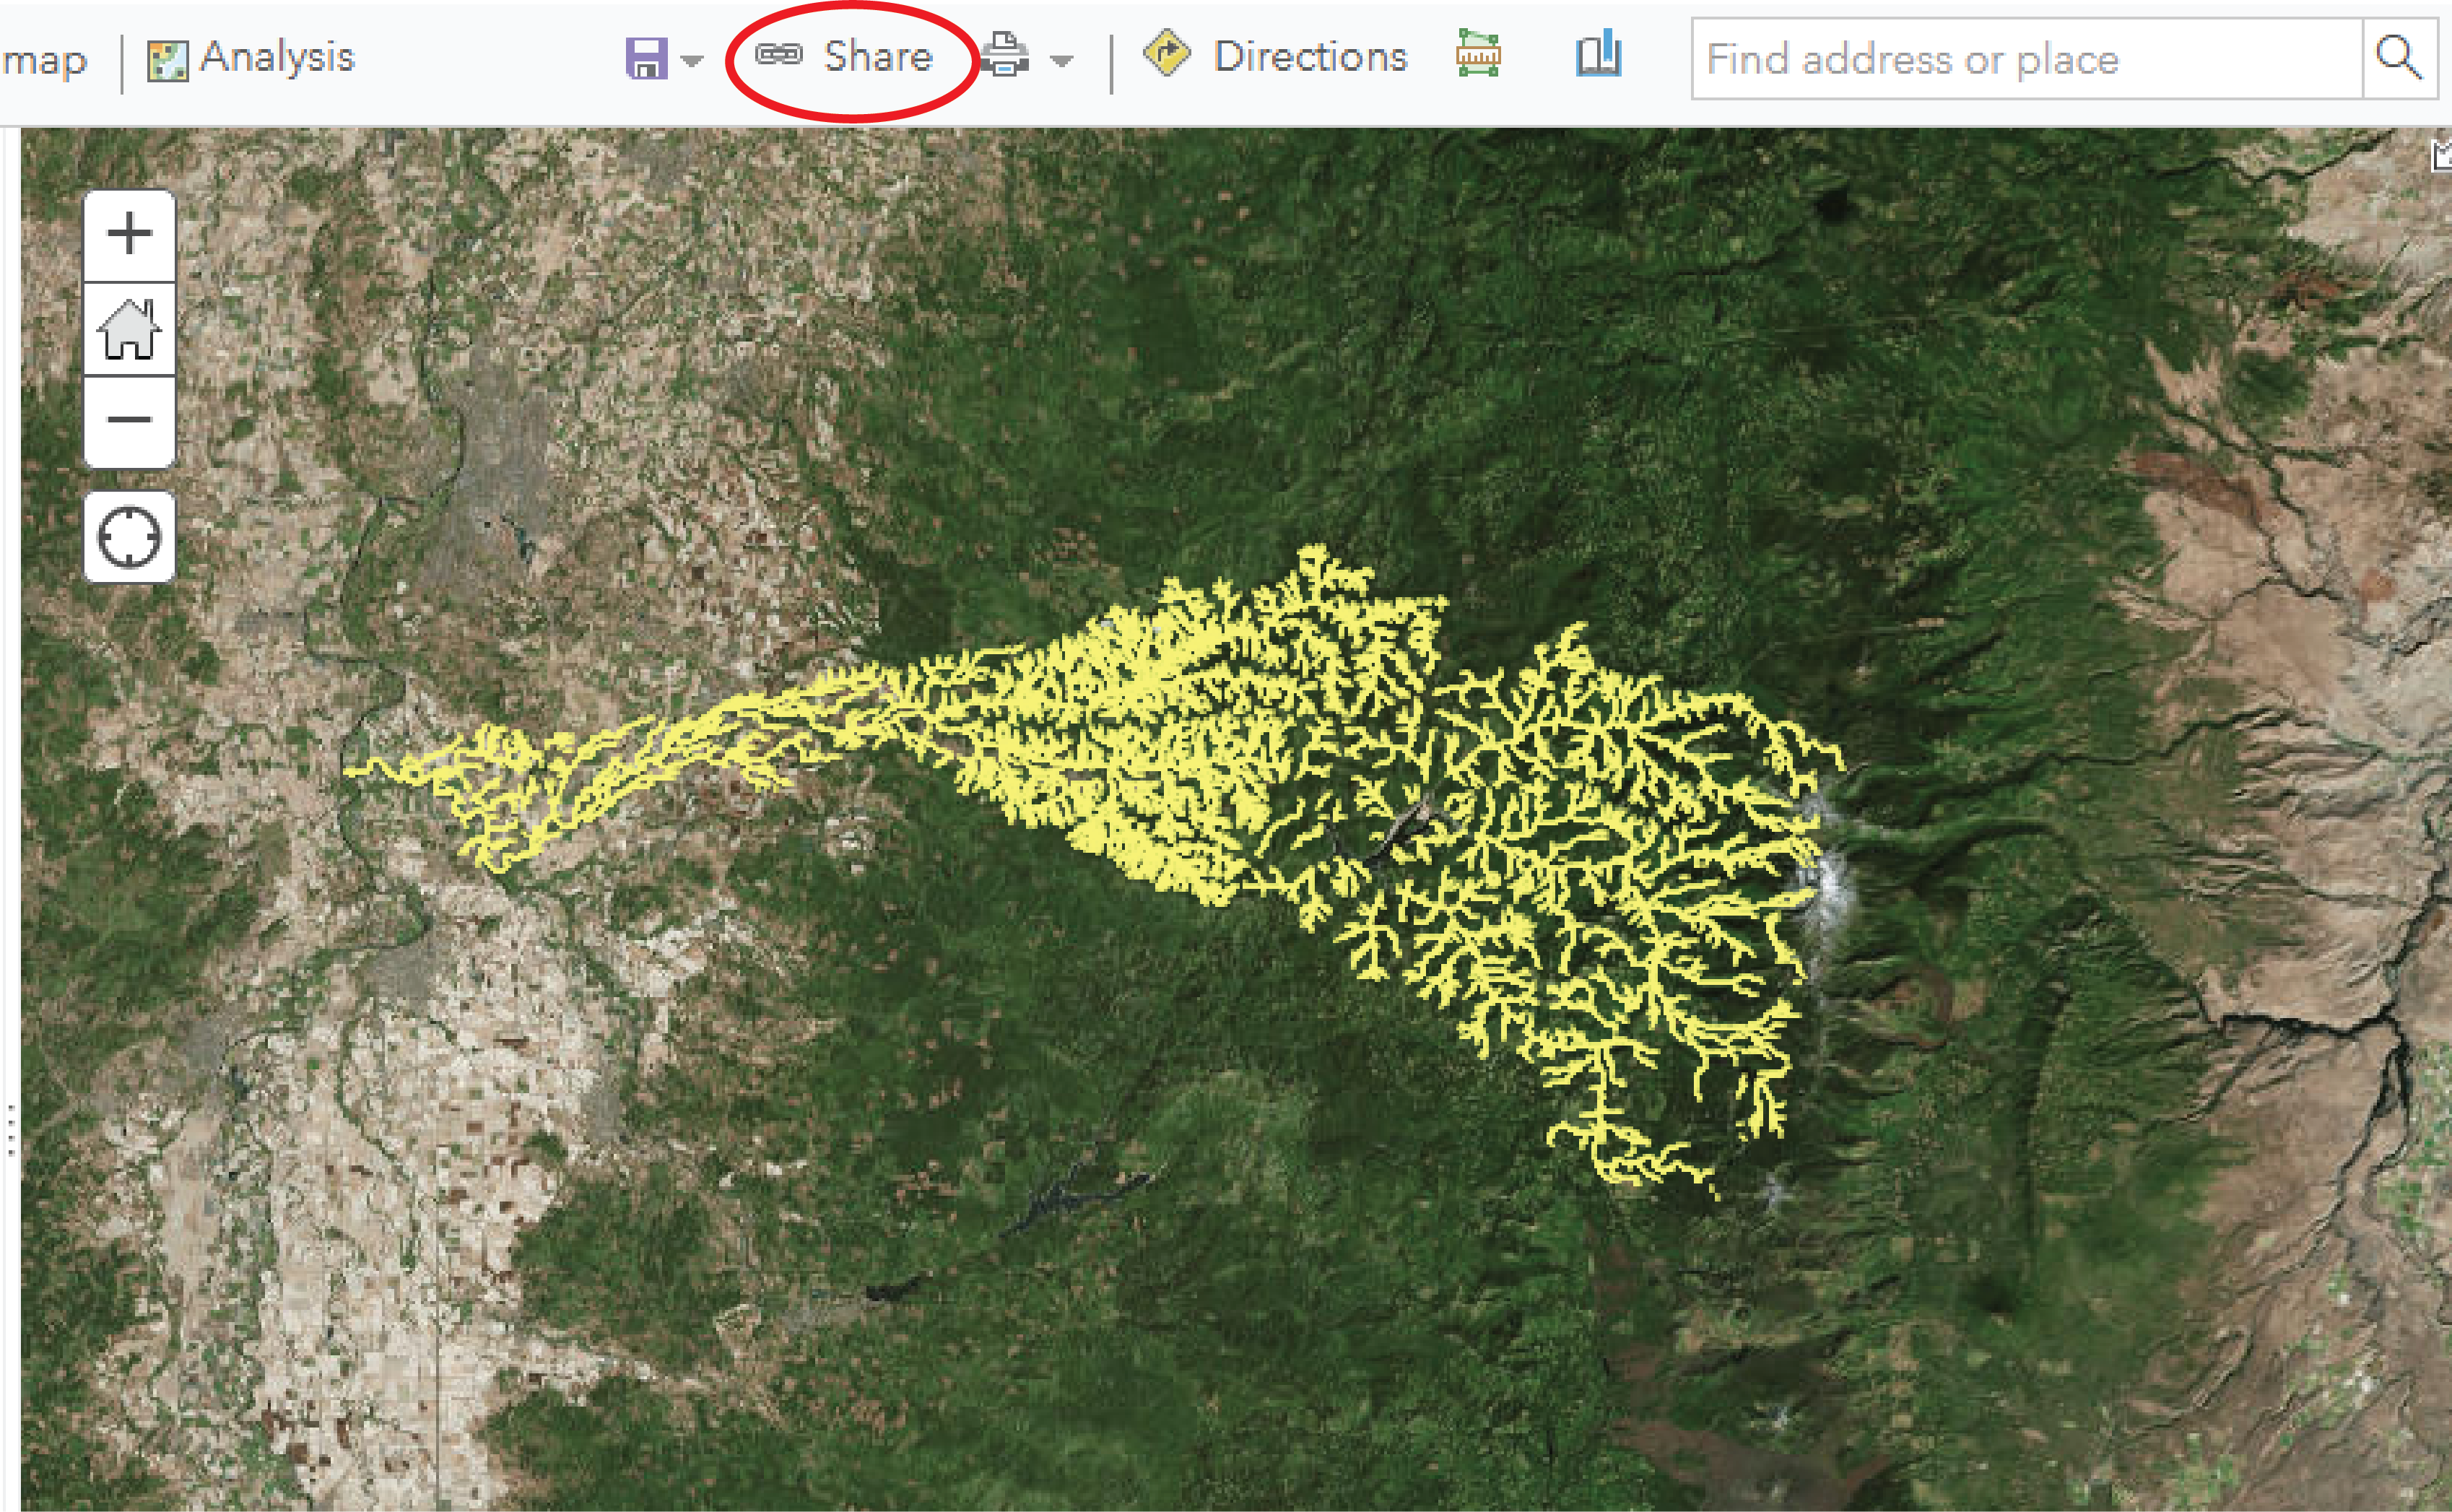
In the window that pops up check the “Everyone (public)” box. Then click “Create a Web App”. If a window pops up saying “Update Sharing” click on the blue button that says “Update Sharing”.
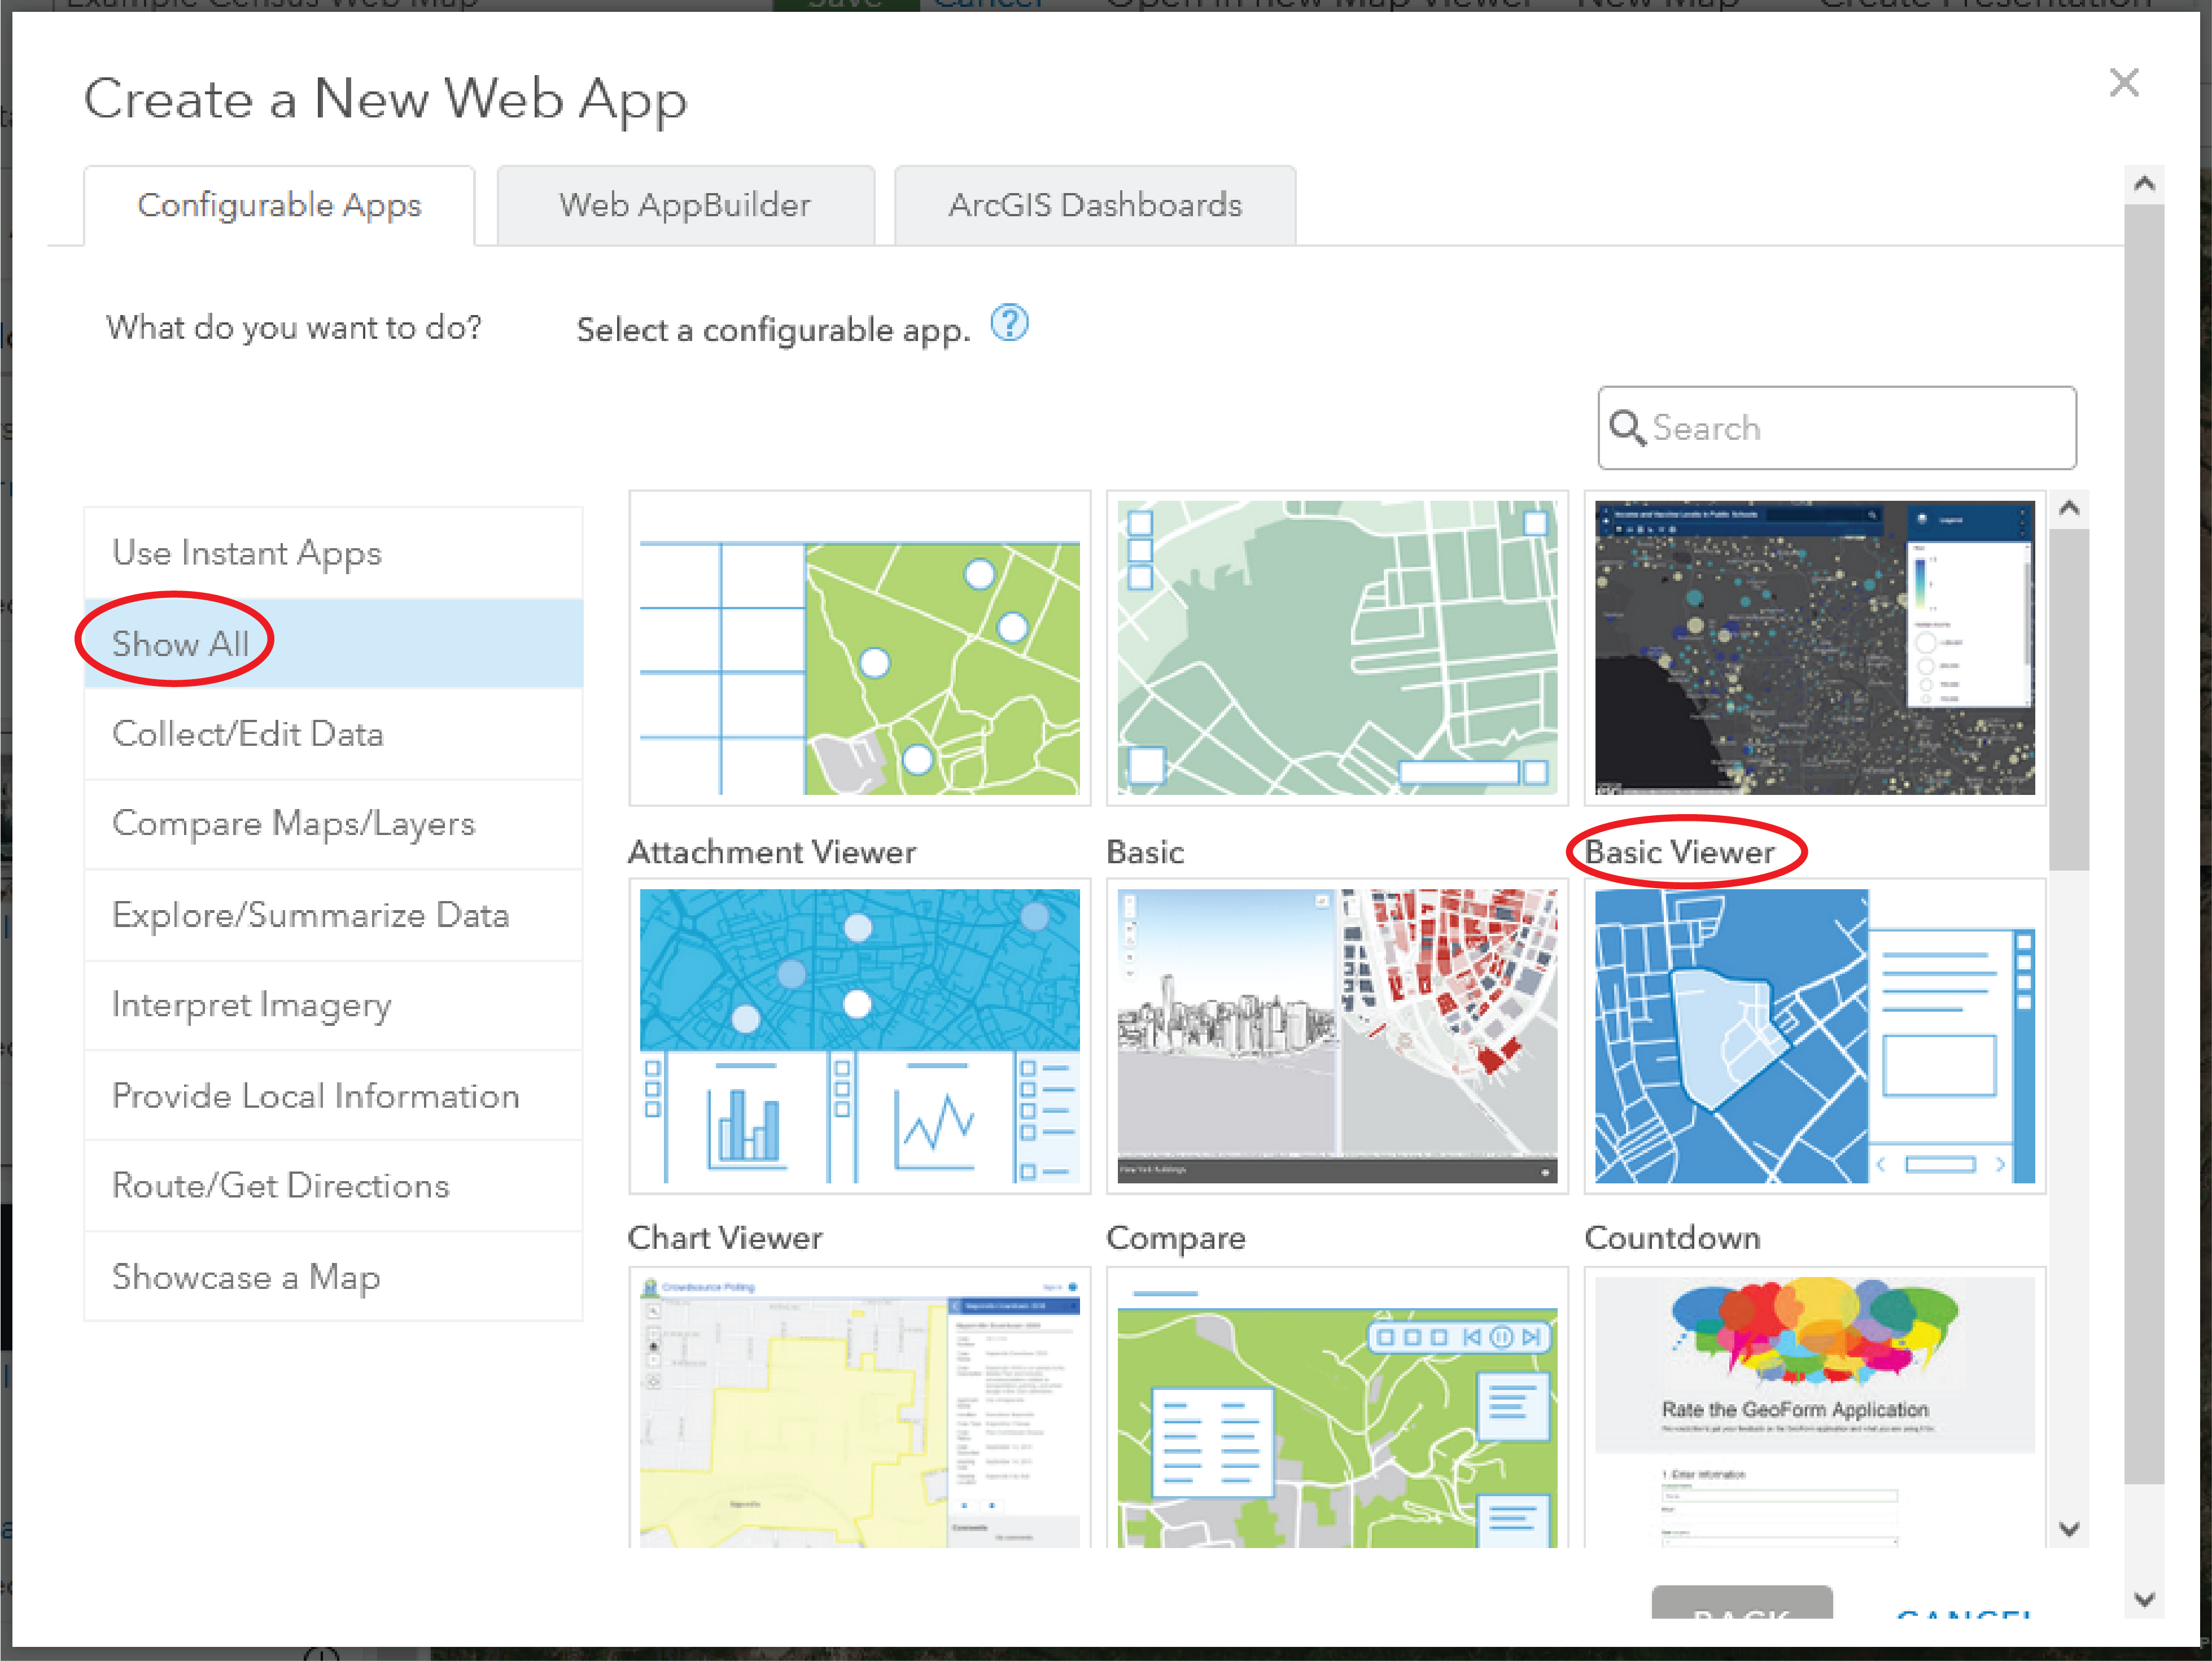
In the menu that pops up to create a new web app click the “Show All” tab and then click the basic viewer app. After clicking on “Basic Viewer” a menu should pop up on the side, from there click “Create Web App”. Give your web app a name and click “Done”.
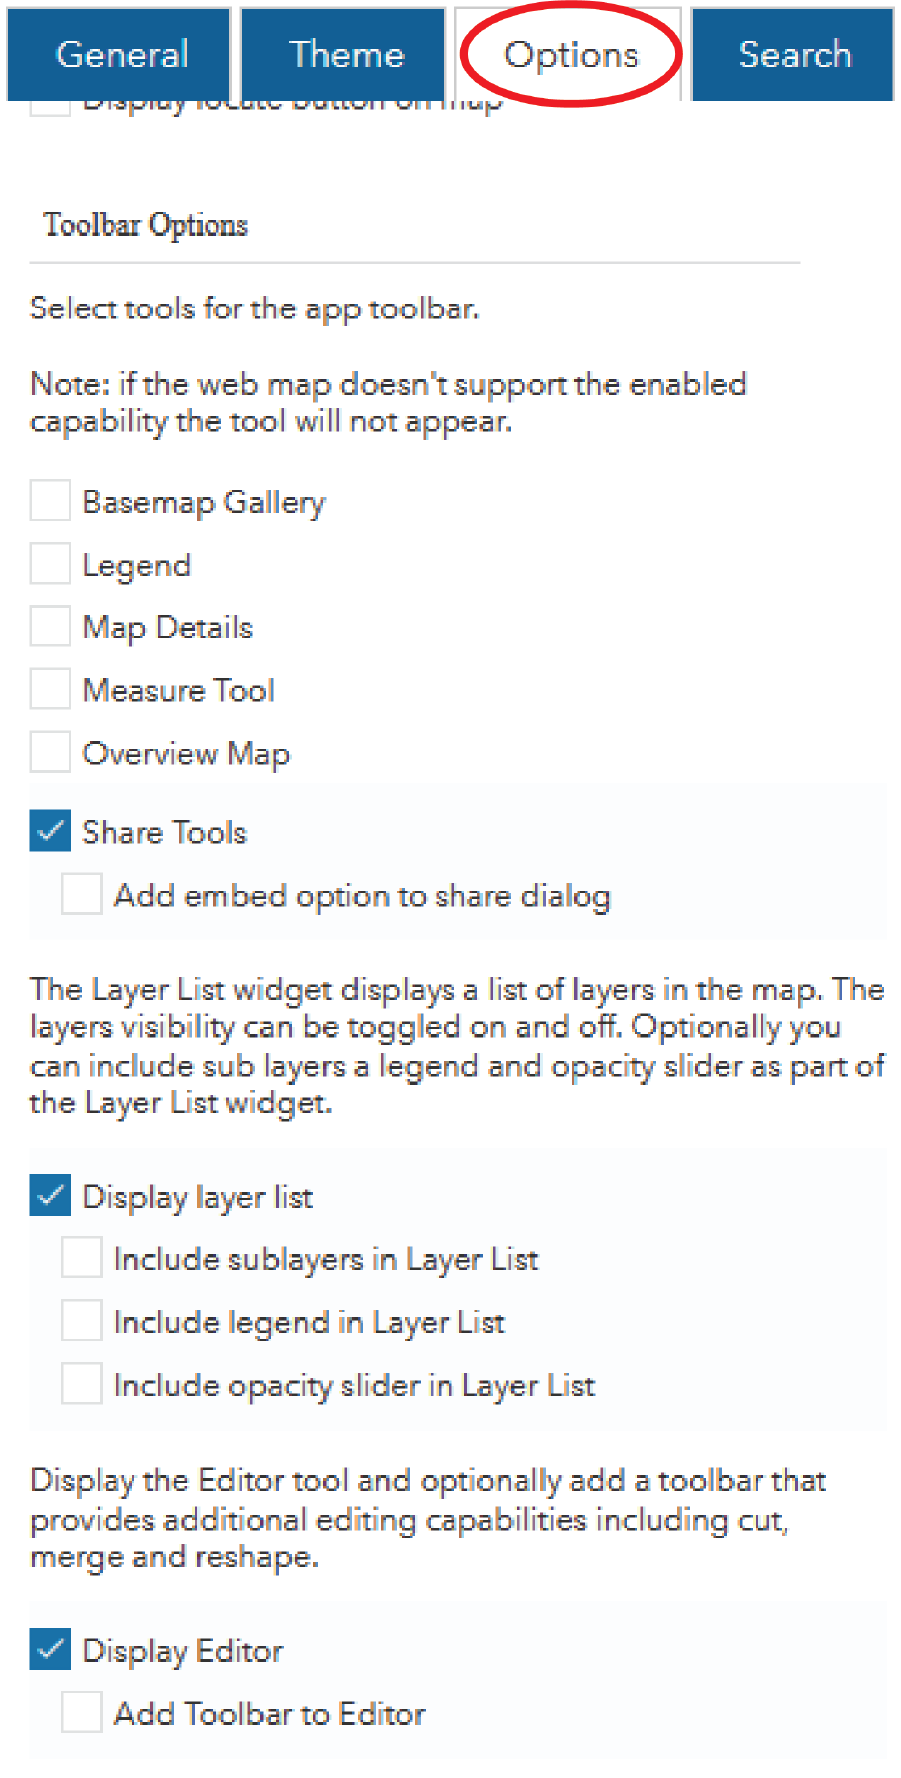
When configuring the web app, we want it to be as concise as possible. In the “Options” tab we will turn off most options. The only options we are leaving on will be “Share Tools”, “Display layer list”, and “Display Editor”, the “Measure Tool” can also be helpful but that tool is optional.
Click “Save” at the bottom of the screen and then you’re done! The web app should appear in the content tab of your ArcGIS Online account.
Using the Web App
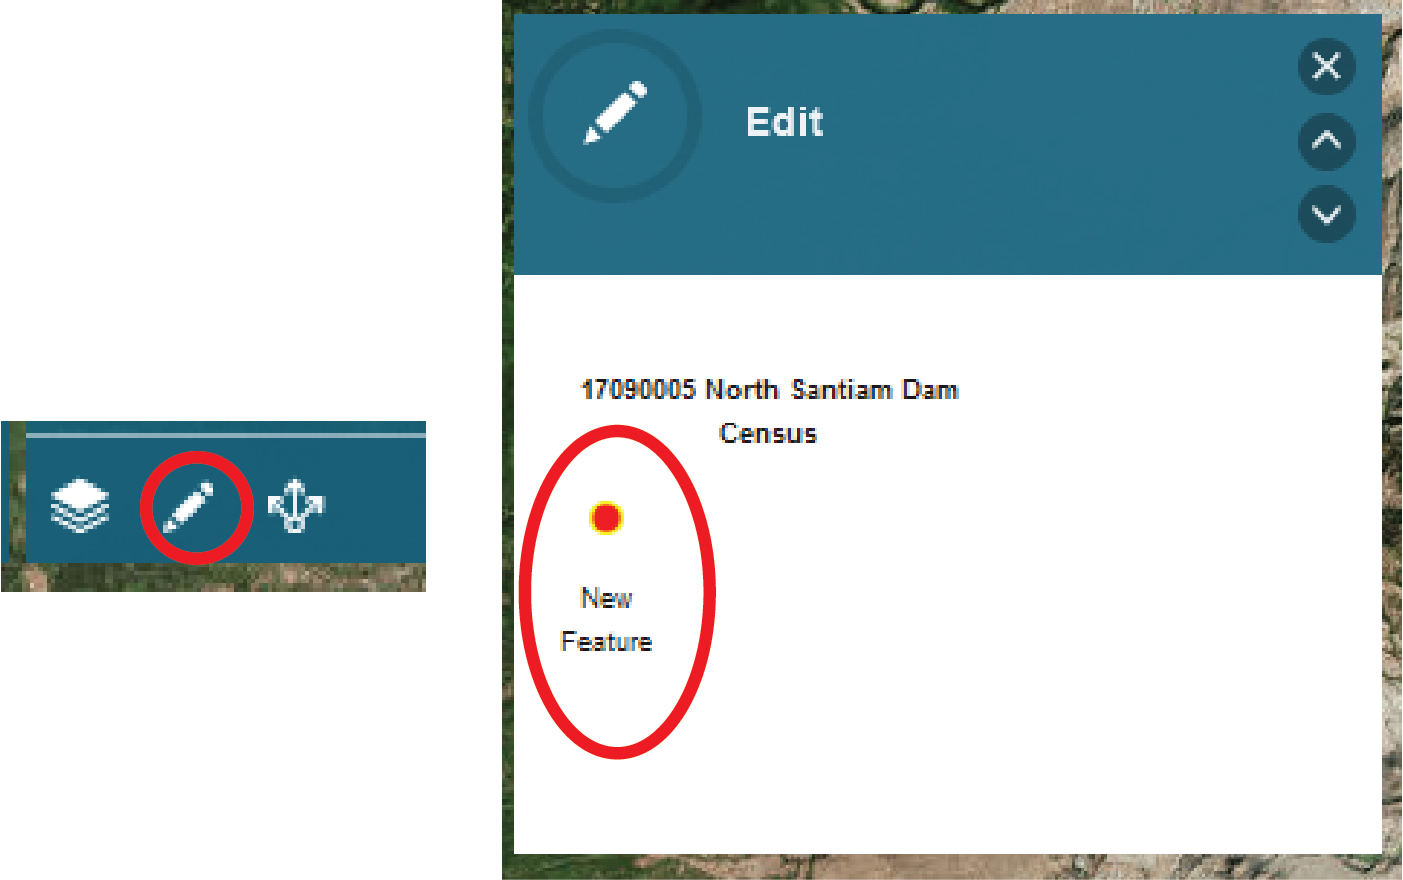
Launch the web app either from the configuration menu in the bottom left or from your ArcGIS Online content. Once it is open click on the pencil icon in the top left menu. Then in the menu that pops up select “New Feature”
Now zoom in on your perennial network and begin moving along the streams systematically, once a dam is observed, click on the map to set a point down and then fill out the menu that pops up. Below is a video guide for using the web app.
If this virtual census is being used as a validation input for BRAT then observation points for dams need to be placed as close as possible to the corresponding NHD network line. An explanation for how these points are used and why points need to be placed on the line can be found here.
Once the census is complete it may be useful to retrieve the points survey as a different file type for use in GIS programs, this can be done by clicking on the feature layer for the survey form your ArcGIS Online content. This feature layer is the one that is just your survey name, not the _fieldworker or _stakeholder. Clicking the feature layer should take you to the overview page for that feature layer. From there select “Export Data” and then select the type you need.
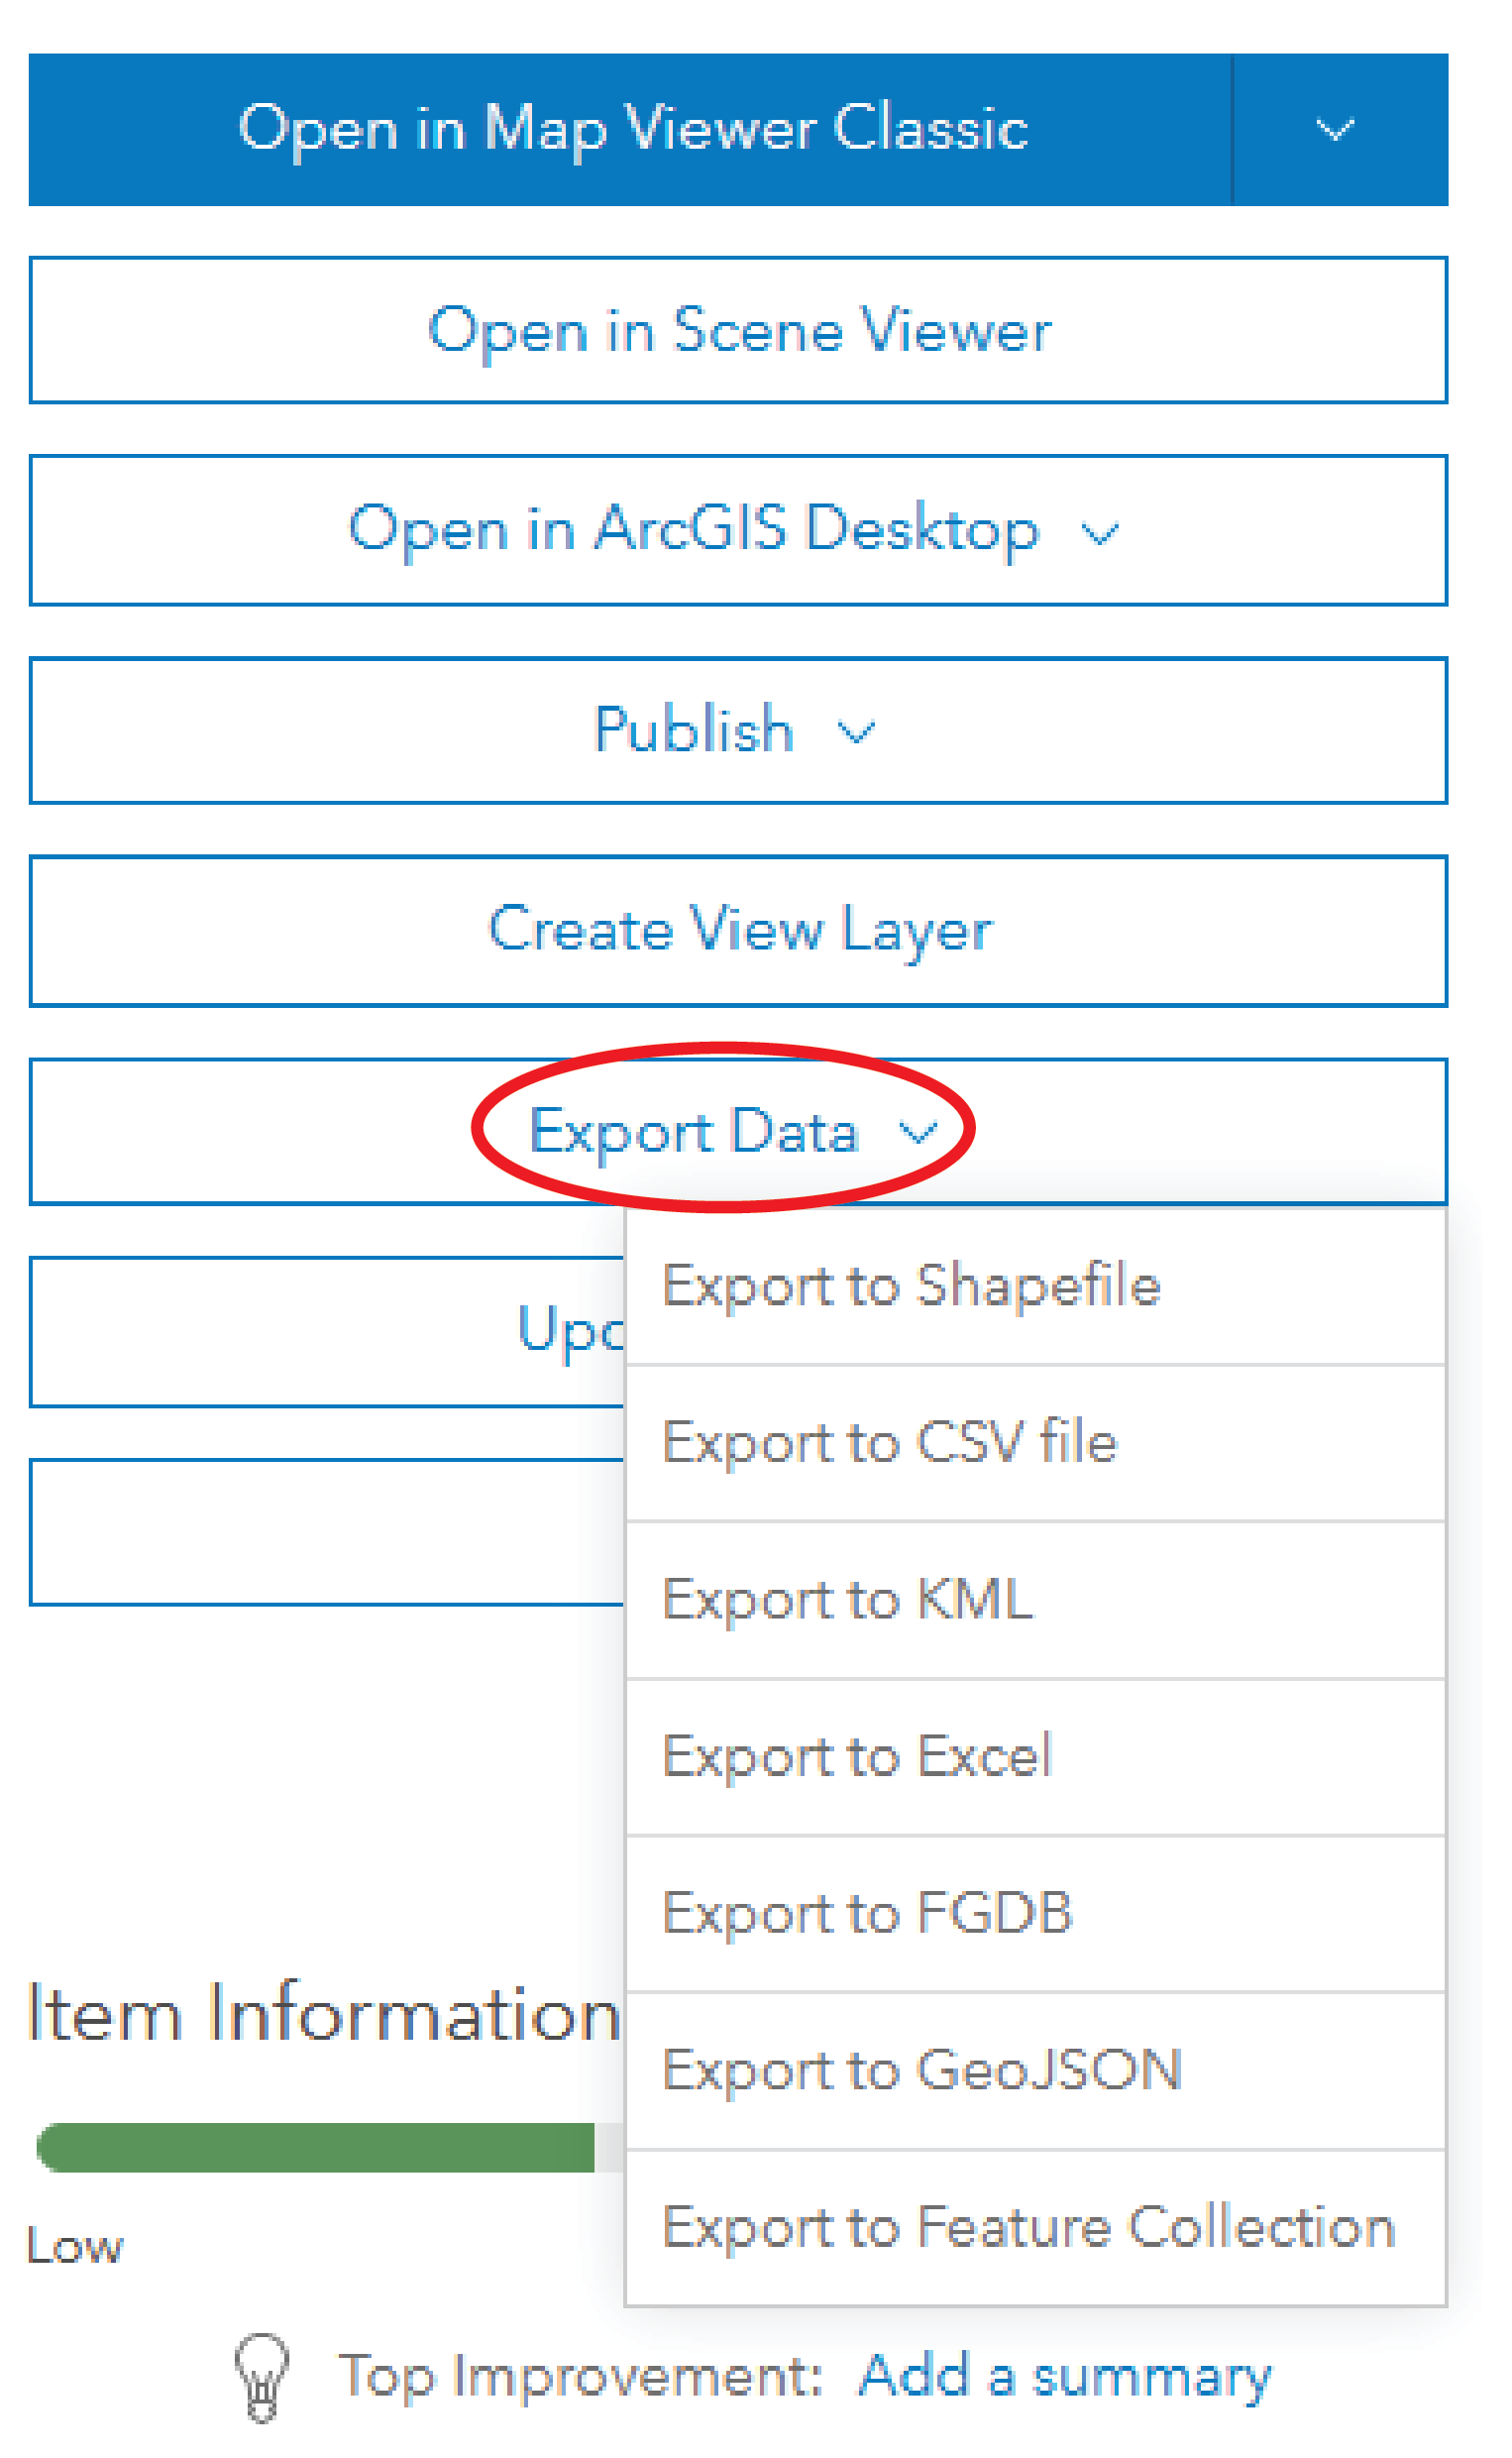
Name the file and pick where you want it to save in your content. From there navigate to where you saved the new file and then click on it to go to its overview page and then click “Download”.
Web Apps
California
Greater Yellowstone Ecosystem
Idaho
Oregon
| Middle Willamette | North Santiam | South Santiam | Upper Williamette | ~ |
|---|---|---|---|---|
 Back to BRAT Home